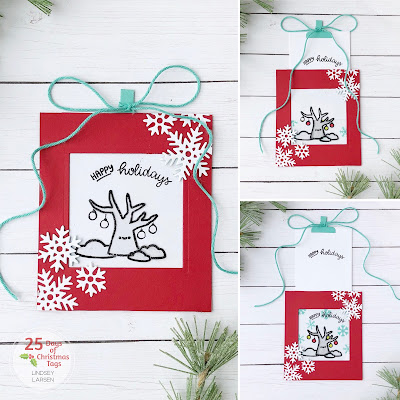
Hello, friends! Today for the 25 Days of Christmas Tags we are featuring a fun new-to-me company.
Today is all about stretching your stamps and getting creative. I was kindly gifted Penguin Palace's My BFF (which at first glance is full of sweet spring images) and the Crystal Snowflakes stencil. I toyed with using the little animals in the stamp set, but kept coming back to the barren tree. The idea of having a tree get dressed up for Christmas made me smile, so I decided to make it happen.
I've always been intrigued by magic color slider cards, and this was my first attempt. I thought this would be a fun way to show the transformation, and let's just say it was a bit of a learning process. It's definitely doable without any special dies (like I did here), but for ease and the sake of time, I think investing in the dies is a wise decision (wink, wink). I looked at a picture of the Lawn Fawn dies and used that as a guide to create a folded pocket with a slit at the top that the white tag slides up through revealing the colored image below.
Second note of advice, there is such a thing as embossable plastic sheets. Definitely worth it to get them. I did not have any, and I won't tell you how many times I had to emboss on this clear cardstock to try to get it to work without warping the plastic too much. And in truth I still ended up having to trim out portions and glue them on top of another unmarred plastic sheet. Live and learn, friends. Live and learn. I think throughout this process I adopted the Little Engine That Could's motto of "I think I can!"
But in the end that sweet little tree did end up in a happy, colorful scene. I stamped some tiny circles and turned them into hanging ornaments and used the smallest snowflakes in the Crystal Snowflakes stencil to add color to the background. The sentiment is a combination of "happy" from the Penguin Palace's My BFF set and "holidays" from Sunny Studio's Hedgey Holidays. Now under normal circumstance I would have embossed the sentiment on the clear cardstock, so it was visible whether in the color reveal version or not, but I didn't have it in me to fight the embossing any more. So...when the tag is opened you get to see the sentiment twice. Just consider it my way of wishing you a doubley happy holiday. :)Moving on. :) After I finished stamping the panel and adhering it on the inside, it was time to dress up the outside of the tag. Since this tag is all about revealing a surprise, it seemed fitting to make the outside look like a gift. A few snowflake die cuts and a big bow on top and voila! A gift.
Thanks for sticking with me through the journey of this tag! I hope you had some smiles and laughs along the way. I know I did. And maybe this little gift will inspire you to make something. But if not, no worries! Head on over to Tracey's blog for a bunch more inspiration options. I hope you have fun creating...even if it includes some learning along the way. ;)


So sweet! Jo x
ReplyDeleteOh Linds!! It’s beautiful!! I love how you managed to make it work without any fancy goodies - it reminds me of the way cardmaking used to be! Though I will say - they sure make things speedier! :) In case you make more, I wanted to share that the clear embossing cardstock I use really does work like a charm (with a good sprinkle of anti static powder). It’s saved my sanity a time or two! lol
ReplyDeleteOh Linds!! It’s beautiful!! I love how you managed to make it work without any fancy goodies - it reminds me of the way cardmaking used to be! Though I will say - they sure make things speedier! :) In case you make more, I wanted to share that the clear embossing cardstock I use really does work like a charm (with a good sprinkle of anti static powder). It’s saved my sanity a time or two! lol
ReplyDeleteYou are too kind! Yes, I would love to know. You make the most amazing things with clear card stock.
DeleteYour darling tag was worth the extra effort!
ReplyDeleteSo creative.
ReplyDeleteYour darling little dressed up tree was so worth it, Lindsey ... so cute and so fun! Hugs, Anita :)
ReplyDelete