Friday, December 15, 2023

Pretty Pink Posh DT Announcement + Christmas Card

Good morning!  Today I'm happy to share that I will be continuing with the Pretty Pink Posh Design Team for another term.  (Thank you, Paulina!) I am surrounded by so much talent on this team and it's humbling for sure.  We are welcoming lots of new faces, so I hope you will visit the Pretty Pink Posh blog to welcome everybody.    
I wanted to make a special card to celebrate the happy news and chose to use some of my old and new favorite Christmas products.  The Stitched Poinsettia is a long time favorite of mine.  I pull it out year after year and never tire of its beauty.  I love it's large size.  
The Winter Foliage Dies are the perfect companion dies.  I had so much fun tucking in berry sprigs and pine cones and building a floral spray of winter goodness.  I blended on just a touch of color to the die cuts using my Waffle Flower 0+ Shader Brushes.  Love them!
For a new favorite, I used the beautiful Hot Foil Merry Christmas.  I'm just so amazed by the beauty and elegance that hot foiling adds.  I also think it is super cool that the Hot Foil Merry Christmas coordinates perfectly with the Merry Christmas Shadow Dies, which I used to die cut it out.  
The Waffle Flower grip mat and 0+ Shader Brushes have made a stencil lover out of me, and I used them to stencil the Layered Winter Wreath on my background. 
Thanks so much for stopping by today!  I hope I've left you inspired in some way.  Have a wonderful weekend, friends

Monday, November 27, 2023

One Last Autumn Thanks + Some Tools I'm Excited About


Hello, friends!  I'm sneaking in one last autumn card before I say goodbye to the season.  (If I hadn't totally forgotten to share this card it would have been here a lot sooner!)  A little while back Waffle Flower offered to send me some goodies to try including their new grip mat and 0+ Shader Brushes (plus being the important part).  So generous of them, and let me just tell you...they are AMAZING!!!  I already feel like I can't live without either one.  I've never had such a stress-free experience blending with stencils.  The grip mat keeps everything secure.  As in my card base and stencil did.not.move.at.all.  It's also awesome in the Misti.  I am amazed that I don't need any kind of magnet or tape to hold my paper down.  I liked the grip mat so much that I actually ordered a second one.  

And these teeny tiny 0+ brushes are exactly what I was missing for my ever-increasing detailed stencils.  They soak up color really quickly and blend with ease.  Previously, I've always struggled to get the ink in really tiny, detailed stencils, especially with out bending the stencil.  I used them to blend this super cool stencil/die duo from Waffle Flower - Fall Leaves Background Stencil and Pop-up Fall Leaves Panel Die.  You die cut the panel and the stencil fits perfectly over top.  The pop-up feature adds the coolest dimension.  

Now you may notice a little bleeding around some of my leaves...that had more to do with a really watery spray I used that I didn't let dry enough before I picked up the card.  Oops!  I used Waffle Flower's Retro Outline Alpha Die to create my sentiment.  I bought this set years ago and am wondering why I don't use these dies more often.  They were just what this card needed. 

Can we talk for a second about this color combination?  I made a color swatch for it months ago but forgot all about it.  The colors are Eggplant, Briar Rose, Tidepool, Juniper, Spiced Cider, and Nectar (all Concord & 9th), and I'm totally smitten.  

This card just makes me smile.  And so do these colors.  And so do these tools.  Can you live without these tools?  Yes.  But now that I have tried them, would I want to?  No.  And they absolutely did not ask me to write this.  I am just so excited I feel like shouting it from the rooftops.  Thanks so much for visiting (and listening) today! :D

Saturday, November 25, 2023

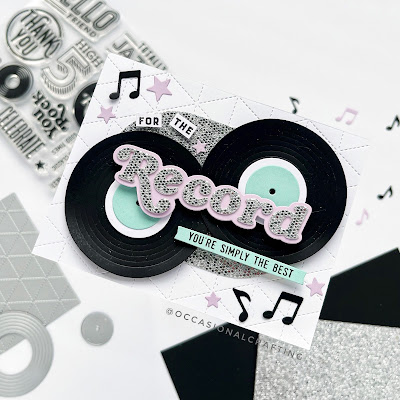
For the Record + Your Paper Insider

Hello!  I'm super excited to share today's card with you.  A month or so ago Your Paper Insider contacted me and asked if I would like to try one of their paper subscription boxes.  They release a curated box of unique papers quarterly and were just about to release Box 5. (They also sell some individual paper packs and assortment packs, though.) They were new to me and I was intrigued, so I said yes.  And I'm so glad I did!  
When the package arrived it totally exceeded my expectations.  First of all, it was so carefully packaged.  I could tell a lot of care was put in to make sure everything arrived safely.  Second, there was such a fun variety of papers.  I expected a variety of colors, but was amazed by the variety of textures.  I'm a really tactile person, and I have to say I've gone through the papers several times just to feel the difference in the papers.  I needed to make a special card for a niece of mine, so I pulled out the super sparkly Silver Diamond Glitter Cardstock and Black Matte EVO Synthetic Paper that has a texture that is difficult to describe.  It's almost rubbery but smooth.  Kind of like vinyl?   I don't quite have the words, but I love the way it feels and it was absolutely perfect for creating records. 
Speaking of records, these come from a the super fun Greatest Hits Bundle by Concord and 9th. I used the Greatest Hits Dies to cut the records, music notes, and stars on my card.  
I built the sentiment with several different sets.   I selectively inked some words from the Perfect Match Stamp Set to get "for the".  Then I used the gorgeous "record" and it's shadow from the For the Record Die Set, cutting it in lilac and the Silver Diamond Glitter Cardstock.  Isn't the sparkle of that paper amazing?!  I loved it so much that I used it again for the oval shape from the For the Record Dies to anchor the records and all the sentiment pieces. Finally I added a banner with a sentiment from the Greatest Hits Stamp Set in Papertrey's Aqua Mist.
I used C9's Triangle Background Dies on my card base and ended with a happy sigh.  This card is so totally my niece, and I absolutely love it.  The fabulous Your Paper Insider papers really made it special.  Thanks so much for stopping by!  It makes me happy to be able to share with others. I hope you have a wonderful weekend, friends!


SUPPLIES:
Paper 
Lilac Cardstock (Concord & 9th)
Aqua Mist Cardstock (Papertrey Ink)
Black Matte EVO Synthetic Paper, Silver Diamond Glitter Cardstock (Your Paper Insider Box 5)

Stamps (all Concord & 9th)

Dies (all Concord & 9th)

Friday, November 24, 2023

Feminine Birthday

For being a cardmaker, I am terrible at making and sending birthday cards.  I managed to get a few caught up this week and had so much fun designing them specifically for each recipient.  They all turned out very different.  This one came together quicker than the others and is a testament that all you need is a few good supplies.  
I started with Concord & 9th's Magnolia Perfect Pairings Dies. The delicate white lines on top of the  nectar cardstock looks like a lace overlay, and I think it is so pretty.  Then I used C9's All The Birthday Bundle to cut the giant "HB" and cut/stamp the sentiment banner.  I layered a little sea glass banner behind for just a hint of color.  
Everything about it reminds me of my lovely niece - soft, feminine, sweet, sparkly. I hope you are headed into a wonderful weekend!  Thanks for visiting!

Thursday, November 23, 2023

Many Thanks

Hello, friends!  I sure am grateful for a day of Thanksgiving.  I may have said this before, but I don't think there could be a more perfect holiday to precede Christmas or to start the wrap up of a year.  It is the nudge many of us need to reflect on the year and recognize the blessings held within.  

I had these thoughts swirling as I created todays card.  I pulled out Pretty Pink Posh's Stitched Pumpkins Dies and cut them in a variety of Concord & 9th colors. I used NectarSorbetSpiced CiderCayenne for the pumpkins and PebbleCobblestone and Papertrey Ink's Ocean Tides for the stems, vines, and leaves.  The playful--even joyful--feel of this wonky stack of pumpkins makes me smile. 

After creating my stack, I pulled out a shimmery piece of cardstock that I have had in my stash for years and cut it with the Slimline Scallop Frame Dies.  I popped all the pumpkins up with dimensional foam, and then I embossed a sentiment from Woodland Thanks onto the smallest Stitched Torn  Rectangle Die. The final touch was a sprinkling of ivory pearls

Many thanks for visiting today!  I am grateful for you!  

Saturday, September 23, 2023

Pretty Pink Posh STAMPtember Collab

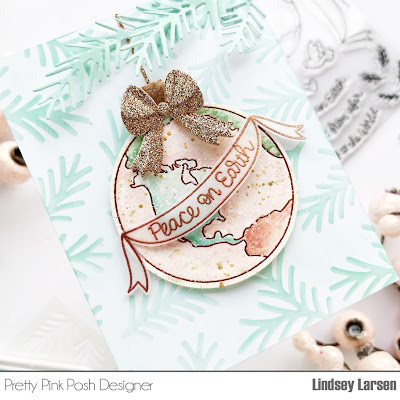
Good morning, friends!  Today I have the pleasure of sharing Pretty Pink Posh's exclusive collaboration for STAMPtember: Peace On Earth.  This set is available only at Simon Says Stamp while supplies last, so make sure you hurry and snatch one up before they're gone.

Some time ago, I saw a pretty pink globe ornament, and it has stayed in the back of my mind.  As soon as I saw Peace on Earth, I knew it was the perfect time to try to recreate that ornament. 


I embossed the world image with Simon Says Stamp Rose Gold Embossing Powder, watercolored it with several Concord and 9th inks (Aqua SkyPink LemonadeSea GlassSorbet), and flicked on some white and gold paint for good measure. 

I hand cut the ornament topper and added a glittery rose gold double bow using the Build A Gift Dies by Pretty Pink Posh.  Finally, I added a vellum embossed banner + sentiment. 

My ornament looked a little out of place all by itself, so I used just the pine stencil in Pretty Pink Posh's Layered Christmas Lights Stencils for the background.  I wanted some color variation, so I blended on both Sea Glass and Aqua Sky inks.  I also die cut some Pine Sprigs from the same blended paper to hang my ornament on.  

Thanks so much for joining me today!  Make sure you quickly go snatch up Peace on Earth before it's gone!


SUPPLIES

Stamps: Peace on Earth 2023 STAMPtember Exclusive

Dies: Pine Sprigs DiesBuild A Gift Dies

Ink: Aqua Sky, Pink Lemonade, Sea Glass, Sorbet

Extras: Simon Says Stamp Rose Gold Embossing Powder

Wednesday, September 20, 2023

Over the Rooftops...Concord & 9th Holiday Release Finale (+ GIVEAWAY on Instagram)

Hello, friends!  It feels like it's been a crafting marathon the last few weeks, but creating with Concord & 9th's Holiday Release has been truly joyful.  And they are so sweet to be sponsoring a giveaway on my Instagram account.  I hope you'll head over there to enter.  

My final project for this week uses the Over the Rooftops Bundle.  It creates the most darling houses and has an interactive element that is so easy and totally doable. 

The details on these houses are itty bitty, so there is definitely a time investment to put these together, but I had a blast not just creating them but then decking them out for Christmas.  

Have you heard of Rainbow Row in Charleston, South Carolina?  I was thinking about how much I love those colorful houses when I created my card, so I used totally non-traditional but fun colors. 

I used the Over the Rooftops Dies to cut the houses in the following colors: 

1st house: Grapefruit with Nectar trim/roof and Dragonfruit door

2nd house: Blueberry with Powder trim, Pebble roof, and Nectar door

3rd house: Dragonfruit with Carnation trim/roof and Blueberry door

The stairs and sidewalk are Pebble , the street is Cobblestone, and the festive decorations are Juniper and Poppy

It's a tough pick, but if I had to choose one, I'd be living in the grapefruit house on the end. The wreaths hanging from the ribbons are my favorite, and I love the garland on the fence.  By the way, the "ribbons" are actually the negative window cuts from a poppy colored house I didn't end up using. And the garland is the same curved window trim I used on the house, but I just flipped it upside down.

Oh, and did you notice the second level balcony on the blueberry house?  Another charming detail on homes we find in the south. :)  I made it by overlapping two of the long fences.  If you peek in the lower window on the Dragonfruit house, you'll see a little Christmas tree.  It was designed to go on top of a super cute station wagon that is included in the Over the Rooftops Dies, but I opted for a peaceful car-less street this time.

Okay, now to talk about the interactive element of this card.  The Over the Rooftops Dies were designed to create a simple spinner card, so you can change from day to night or just switch up the scene/sentiments. (Remember, you can totally change colors to use this set any time of the year.)

One of the papers in the Falala Patterned Paper Pack has snowflakes on it with half the sheet in powder blue and the other half of the sheet in midnight.  It could not have been more perfect for the changing scene on my card.  I simply aligned the center line on the circle die with the line on the paper separating the two colors and voila! Day and night for my spinner.  

On the day version, I stamped a sentiment from the  Over the Rooftops Stamps onto a layered banner and added some little trees to the mountaintop.   

On the night version I added Santa and some of his little reindeer. Aren't these dies the cutest?

If you want more info on how to assemble the card, Laura Bassen and Carissa Wiley each put together really great tutorials.  I used them especially for the spinner element.  You can find them here and here.  


Thanks so much for joining me today and throughout the week!  And don't forget to head over to my instagram account to enter the Concord & 9th giveaway.  Best of luck!

SUPPLIES

Cardstock: Nectar, GrapefruitCarnationDragonfruitPowderBlueberryJuniperPoppyPebbleCobblestone

Patterned Paper: Falala Patterned Paper Pack 

Dies: Over the Rooftops Dies

Stamps: Over the Rooftops Stamps

Tuesday, September 19, 2023

Ornament Stamp & Stitch Bundle with Concord & 9th

The stitching fun continues friends!  This month Concord and 9th released not one but two stitching dies in their Holiday Charm Release.  Today I'm highlighting the Ornament Stamp & Stitch Bundle.  This set is the best of all worlds.  It creates amazing results with just stamps, dies, stitching or a combination of all three.  I have used it all the different ways and equally love the results.

The color scheme I chose for this card is Nectar, Sorbet, Evergreen, and Stardust.  I just love it!  But then you probably aren't surprised because I think Nectar showed up on nearly all of my projects this release. 
This card is full of texture, and I'll start with the background.  I made it with pines from the Take a Bough Encore Dies.  I decided not to glue them down completely and I think it made all the difference in the world.  That might be overly dramatic...but maybe not.  It made more of an organic feel, and I'm a big fan!
Next up are the ornaments, which come in two sizes.  
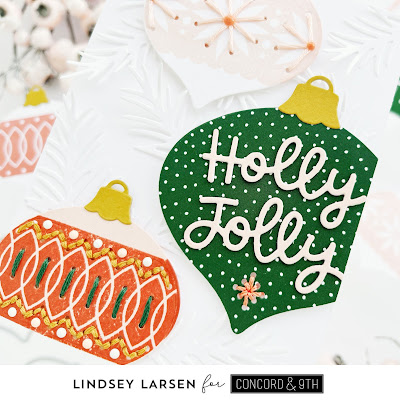
On the biggest ornament, I used the Ornament Stamp & Stitch Dies to die cut the evergreen polka dot patterned paper from the new Falala Patterned Paper Pack.  It's one of my favorite papers in the pack.
I added a cute sentiment from the set in Nectar cardstock, and then stitched on a little star/snowflake.  The die comes with three of these little stars that are aligned to go around a stamp that says "Let's be merry", but I just used a portion of the die on my ornament. 
Next up is the poinsettia ornament.  I stamped this one in Nectar and used a coordinating floss to stitch.  Then I added sorbet enamel dots to the centers. 
The final ornament is the most ornate and reminds me of something that my grandmother would have bought.  She decorated the most gorgeous trees each year, switching out the color schemes and ornaments she used. 
I stamped the ornament in Sorbet onto Nectar cardstock.  Then I stitched with evergreen and stardust floss (floss numbers below).  Finally, I added alternating white and nectar enamel dots.  It's a little tricky to see the color variation in the photos. 
If you are wondering which flosses I used to match, here they are: 
Nectar = DMC 967
Sorbet = DMC 3341
Evergreen = DMC 561 
Stardust = DMC 729 (I think you could probably find a closer match for this one, but when I bought floss, I hadn't planned on using this color, so I just had to choose from what I had on hand later.) 

That's all for me today!  I'll be back tomorrow with one my final project for Concord & 9th's Holiday Charm Release.  Thanks so much for stopping by!


SUPPLIES (with shoppable links)

cardstock & inks: Nectar, GrapefruitEvergreen, StardustFalala Patterned Paper Pack 

stamps: Ornament Stamp & Stitch Stamps 

dies: Ornament Stamp & Stitch Dies, Take a Bough Encore Dies 

extras: white enamel dotsnectar enamel dotssorbet enamel dots