Thursday, May 23, 2024

Concord and 9th Special Release Hop

Good morning, friends!  Concord and 9th is doing a special release today with some awesome products that were originally created for the Crop & Create events hosted by Scrapbook & Cards Today Magazine.  I'm thrilled to be participating in an Instagram Hop to showcase some of these fun, new items.  (Make sure to click here to join all the fun on my instagram account and enter the giveaway.)

Today I get to share with you the Lattice Corner Cuts Dies.  You may remember the previously released Festive Corner Cuts Dies that I showcased last fall in this post.  Well, the Lattice Corner Cuts were actually the inspiration for that set and hold so many of the same fun design possibilities. 

Now, you can totally keep it simple and die cut the Lattice Corner Cut and leave it as is and the result is truly beautiful.  Or you can slightly offset and layer the cuts, OR you can choose an inlay design, which is what I did on today's card.  

I chose a fun color combination of Aqua SkyOceansidePeacockCarnationSweet PeaDragonfruit.  I die cut the Lattice Corner Die in all of these colors + white, and then set about creating my design.  I chose an alternating ombre pattern, but you would be amazed and how different this die looks depending on where you place colors.
Being inspired lately by Concord & 9th's Shortcuts Dies, I decided to finish the card base with some angled blocks of color in Peacock and Dragonfruit.
The Lattice Corner Cuts Dies include more than just the corner cut.  It also includes a layered "thanks" sentiment as well as some flowers and leaves, so I wanted to add them to my card as well.  I blended Carnation and Dragonfruit inks onto the blooms and Oceanside and Peacock inks onto the leaves.
I finished the card by adding the sentiment in gold foil paper
There are so many fun possibilities with the Lattice Corner Cuts Dies!  I hope you've been inspired today.  Remember these and a bunch more fabulous bundles are all available today.  Yay!  You can head here to shop. :) Oh, and don't forget to head to my instagram account and enter the giveaway.  Have a fantastic day, friends!

Card Supplies:

Lattice Corner Cuts

Ink/Cardstock: Aqua SkyOceansidePeacockCarnationSweet PeaDragonfruitMatte Gold Foil Paper

Friday, May 10, 2024

Pretty Pink Posh Blog Hop: Day 3


Welcome to Day 3 of Pretty Pink Posh's May Release Blog Hop! (You should be arriving from the talented Zsofia Molnar's blog.) And of course there is a giveaway along with the blog hop, so make sure you check out the bottom of my post for all the details.  
This month is full of celebrations from graduations to weddings to babies to 4th of July.  There are so many fun products including a super cute new addition to the Big Cupcake line up called the Big Celebration Cupcake Die.  It comes with tons of fun accessories for summery goodness, and I chose to do a 4th of July card.  That holiday seems to sneak up on me every year, so I'm hoping if I get a head start, I'll actually get cards in the mail on time.  


I started my card with a bold background on the card base using one of the Layered Stars Stencils.  Then I pulled out the Stitched Torn Rectangles Dies. On this layer I flicked on shimmery silver and red.  The splatters remind me of fireworks exploding in the sky, which I love. 

Next up the Big Celebration Cupcake Die.  I started with the frosting.  I was thinking of firecracker popsicles when I made this.  I die cut two frosting layers, one of card stock, one of post-it paper to use as a mask.  Then I cut the mask along the cut detail lines in the die, so I could blend different colors onto the frosting but still follow the curves of the design. 

I also ink blended the cupcake liner because it helped enhance the stitched design in it. The cupcake itself is from the Big Birthday Cupcake Die.

I added a sentiment from the 4th of July Stamp Set onto a banner from Big Celebration Cupcake and then got to decorating the cupcake with lots of little bits from the die set. Aren't those sparklers and rockets fun? 

Pardon my pun, but I really do think this card is exploding with happiness.  I'm sure I love it more because one of my sisters loves fireworks more than anyone I know, so I can't help but think of her when I see this, but I hope you love it, too.

Thanks so much for stopping by today!  Let's get to the giveaway.  

*****GIVEAWAY*****

There are three $30 gift certificates up for grabs (one winner each day). Winners will be picked randomly along the blog hop, so make sure to comment along the way. Comments must be left by 11:59 PM PST on 5/15/2024. Winners will be announced on the PPP blog.  You're next stop is the talented Rachel Kleinman, but I'll include the whole line-up below in case you are just now joining us. 

Blog Hop Day 3:

**********

Card Supplies:

Big Celebration Cupcake Die

Big Birthday Cupcake Die

Stitched Torn Rectangles Dies

4th of July Stamp Set

Layered Stars Stencil

Sunday, May 5, 2024

Waffle Flower May Release Day + GIVEAWAY

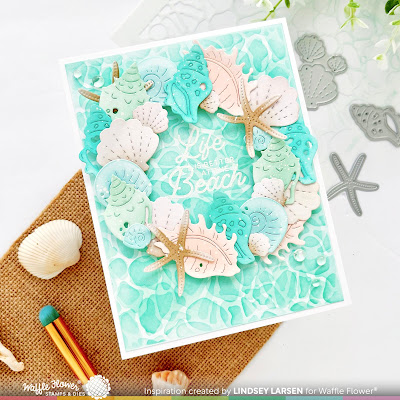
Good morning!  Release day is finally here for Waffle Flower's Beach Day Release.  Hooray!   You can shop all the new goodies HERE.  Plus, I have a GIVEAWAY to share with you, so make sure you read to the bottom of the post.  I'm so excited to share today's card with you.  It reminds me of my mom, so I love it extra.  

The Sea Foam Stencil is a must have in my opinion.  I wanted to use it on every single project…and I nearly did! I started this card by blending aqua ink through the stencil, then flipping the stencil upside down and doing it again.  I love how it creates the overlapping lines and shades of color. 
I was also completely smitten by the Seashells Dies.  I love the variety of shells included!  I was determined to use all the seashells and lots of them, so I fashioned them into a wreath on my card.  
I used a light hand blending ink in a variety colors on the shells, and then flicked some white paint on top.  In the center of the wreath I embossed a sentiment from the Beach Tote Sentiments Stamp Set. And I'm quite certain my mother (who loves to to collect seashells) would agree: life is better at the beach. 
Finally, I sprinkled on a few dew drops, which seemed to be the perfect finishing touch.  

Thanks so much for visiting today!  I hope that you head over to the Waffle Flower Shop to check out this amazing new release, and make sure to leave a comment below to enter the giveaway. Keep reading for giveaway details...

*****GIVEAWAY*****

Just leave a comment below by 11:59 pm EST May 7, 2024 and you will have a chance to win a $20 gift certificate to Waffle Flower Crafts.  I'll be accepting comments on my instagram account, too, so make sure you head over there as well for an additional entry. :) Several other design team members are hosting giveaways, and you can use #WaffleFlowerGiveaway to quickly search for them. 

Saturday, May 4, 2024

Waffle Flower Sneak Peek Day 3

Hello, friends!  Today is the third and final day of sneak peeks for Waffle Flower's Beach Days Release.  I am so excited to share today's card.  It features the new Beach Tote Die and Stamps.  You are going to LOVE them!  

The Beach Tote Die was love at first sight for me!  Designing your own bag is so much fun!  You can have add a pocket or not, add a pattern to the tote or not, add a wrap around handle or not.  I'm a huge fan.  

I masked sections of the bag and blended ink to make the stripes.  Then I added the pocket and a little monogram to make it extra personalized for the recipient.  That "B" Is actually part of one of the sentiments in the Beach Tote Sentiments Stamp Set

The bag is big enough to hold a gift card or stuff full of darling beach goodies like I did here.  The Beach Tote Die can fit on a card, but it's also big enough to work as a shaped card or tag.  It is awesome! I used one of the Nesting Circles Dies and the Beach Umbrella Stencil to create the beach ball. 

I took inspiration from a pair of my daughter's sunglasses from the Beach Tote die set and used glossy accents and glitter to give them dimension and really make them sparkle. 
I finished my card with some sand die cut with the Wavy Border Die and a sentiment from the Birthday Wishes Stamp Set.  I loved the "filled" part paired with a bag full of fun beach gear.  Hope you have a wonderful Saturday!  The release goes live tomorrow.  Yay!

Friday, May 3, 2024

Waffle Flower Sneak Peek Day 2: Postage Collage Beach Days

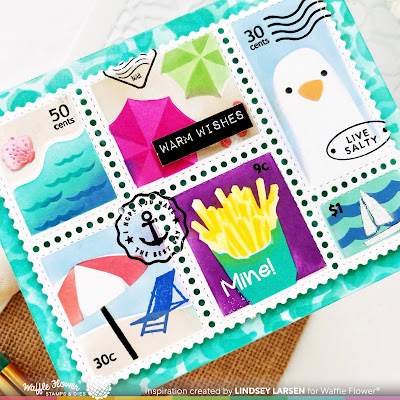
Hello!  Welcome to Day 2 of the Waffle Flower Sneak Peeks.  Today I'm sharing a card made with the newest addition to the fabulous Postage Collage Collection - Beach Days. 

The Postage Collage Beach Days Stencil brilliantly captures the fun of the beach!  I went bright and bold on this card, adding some extra details with the coordinating Postage Collage Beach Days Stamps as well as the previously released Postage Collage Stamp Set.  I just can't get enough of the  Postage Collage Die and all of the coordinating stencils. :) 

I added a little seashell from Seashells Dies to the beach scene on the upper left stamp.  It seemed right at home there.  The "warm wishes" comes from the Subsentiments Shore Diecut.
Remember how I mentioned yesterday how I absolutely adore the Sea Foam Stencil?  Well, it made the perfect backdrop for these fun beach scenes. 

Thanks for visiting today!  I'll be back again with another peek tomorrow, and I have to say that I am super excited about it.  Don't forget all of these fun new products will go live for purchase on May 5, so just two more sleeps. :) 

Thursday, May 2, 2024

Waffle Flower Beach Days Release - Day 1 Sneak Peeks

Hello, friends!  I cannot believe May has arrived already!  But the good news about that is that a new month means a new Waffle Flower release and this one will definitely have you eager for summer.  The May release theme is "Beach Days" and today I'm giving you a sneak peek of the Beach Umbrella Die-n-Stencil.  It will be available for purchase on May 5. 

A bird’s eye view of the beach is one of my favorite views.  I had the best time creating this scene, dotting the beach with colorful umbrellas using the Beach Umbrella Die-n-Stencil and pretending like I had drawn “hi” in the sand with my toes using the Beach Days Greetings Stamp Set.  

And of course, no beach scene would be complete without a little splash of ocean, which I added using the Sea Foam Stencil.  I absolutely LOVE this stencil!  I wanted to use it on every card...and I nearly did! Lol. 

Thanks so much for visiting today!  Make sure you come back tomorrow because I'll have another sneak peek to share. :)