Saturday, September 23, 2023

Pretty Pink Posh STAMPtember Collab

Good morning, friends!  Today I have the pleasure of sharing Pretty Pink Posh's exclusive collaboration for STAMPtember: Peace On Earth.  This set is available only at Simon Says Stamp while supplies last, so make sure you hurry and snatch one up before they're gone.

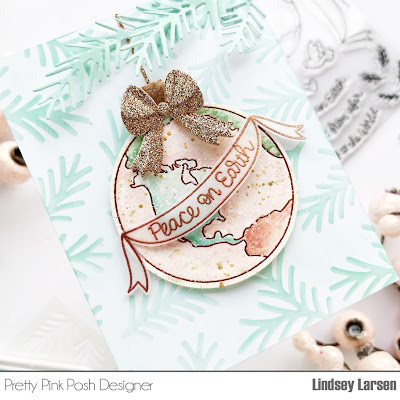
Some time ago, I saw a pretty pink globe ornament, and it has stayed in the back of my mind.  As soon as I saw Peace on Earth, I knew it was the perfect time to try to recreate that ornament. 


I embossed the world image with Simon Says Stamp Rose Gold Embossing Powder, watercolored it with several Concord and 9th inks (Aqua SkyPink LemonadeSea GlassSorbet), and flicked on some white and gold paint for good measure. 

I hand cut the ornament topper and added a glittery rose gold double bow using the Build A Gift Dies by Pretty Pink Posh.  Finally, I added a vellum embossed banner + sentiment. 

My ornament looked a little out of place all by itself, so I used just the pine stencil in Pretty Pink Posh's Layered Christmas Lights Stencils for the background.  I wanted some color variation, so I blended on both Sea Glass and Aqua Sky inks.  I also die cut some Pine Sprigs from the same blended paper to hang my ornament on.  

Thanks so much for joining me today!  Make sure you quickly go snatch up Peace on Earth before it's gone!


SUPPLIES

Stamps: Peace on Earth 2023 STAMPtember Exclusive

Dies: Pine Sprigs DiesBuild A Gift Dies

Ink: Aqua Sky, Pink Lemonade, Sea Glass, Sorbet

Extras: Simon Says Stamp Rose Gold Embossing Powder

Wednesday, September 20, 2023

Over the Rooftops...Concord & 9th Holiday Release Finale (+ GIVEAWAY on Instagram)

Hello, friends!  It feels like it's been a crafting marathon the last few weeks, but creating with Concord & 9th's Holiday Release has been truly joyful.  And they are so sweet to be sponsoring a giveaway on my Instagram account.  I hope you'll head over there to enter.  

My final project for this week uses the Over the Rooftops Bundle.  It creates the most darling houses and has an interactive element that is so easy and totally doable. 

The details on these houses are itty bitty, so there is definitely a time investment to put these together, but I had a blast not just creating them but then decking them out for Christmas.  

Have you heard of Rainbow Row in Charleston, South Carolina?  I was thinking about how much I love those colorful houses when I created my card, so I used totally non-traditional but fun colors. 

I used the Over the Rooftops Dies to cut the houses in the following colors: 

1st house: Grapefruit with Nectar trim/roof and Dragonfruit door

2nd house: Blueberry with Powder trim, Pebble roof, and Nectar door

3rd house: Dragonfruit with Carnation trim/roof and Blueberry door

The stairs and sidewalk are Pebble , the street is Cobblestone, and the festive decorations are Juniper and Poppy

It's a tough pick, but if I had to choose one, I'd be living in the grapefruit house on the end. The wreaths hanging from the ribbons are my favorite, and I love the garland on the fence.  By the way, the "ribbons" are actually the negative window cuts from a poppy colored house I didn't end up using. And the garland is the same curved window trim I used on the house, but I just flipped it upside down.

Oh, and did you notice the second level balcony on the blueberry house?  Another charming detail on homes we find in the south. :)  I made it by overlapping two of the long fences.  If you peek in the lower window on the Dragonfruit house, you'll see a little Christmas tree.  It was designed to go on top of a super cute station wagon that is included in the Over the Rooftops Dies, but I opted for a peaceful car-less street this time.

Okay, now to talk about the interactive element of this card.  The Over the Rooftops Dies were designed to create a simple spinner card, so you can change from day to night or just switch up the scene/sentiments. (Remember, you can totally change colors to use this set any time of the year.)

One of the papers in the Falala Patterned Paper Pack has snowflakes on it with half the sheet in powder blue and the other half of the sheet in midnight.  It could not have been more perfect for the changing scene on my card.  I simply aligned the center line on the circle die with the line on the paper separating the two colors and voila! Day and night for my spinner.  

On the day version, I stamped a sentiment from the  Over the Rooftops Stamps onto a layered banner and added some little trees to the mountaintop.   

On the night version I added Santa and some of his little reindeer. Aren't these dies the cutest?

If you want more info on how to assemble the card, Laura Bassen and Carissa Wiley each put together really great tutorials.  I used them especially for the spinner element.  You can find them here and here.  


Thanks so much for joining me today and throughout the week!  And don't forget to head over to my instagram account to enter the Concord & 9th giveaway.  Best of luck!

SUPPLIES

Cardstock: Nectar, GrapefruitCarnationDragonfruitPowderBlueberryJuniperPoppyPebbleCobblestone

Patterned Paper: Falala Patterned Paper Pack 

Dies: Over the Rooftops Dies

Stamps: Over the Rooftops Stamps

Tuesday, September 19, 2023

Ornament Stamp & Stitch Bundle with Concord & 9th

The stitching fun continues friends!  This month Concord and 9th released not one but two stitching dies in their Holiday Charm Release.  Today I'm highlighting the Ornament Stamp & Stitch Bundle.  This set is the best of all worlds.  It creates amazing results with just stamps, dies, stitching or a combination of all three.  I have used it all the different ways and equally love the results.

The color scheme I chose for this card is Nectar, Sorbet, Evergreen, and Stardust.  I just love it!  But then you probably aren't surprised because I think Nectar showed up on nearly all of my projects this release. 
This card is full of texture, and I'll start with the background.  I made it with pines from the Take a Bough Encore Dies.  I decided not to glue them down completely and I think it made all the difference in the world.  That might be overly dramatic...but maybe not.  It made more of an organic feel, and I'm a big fan!
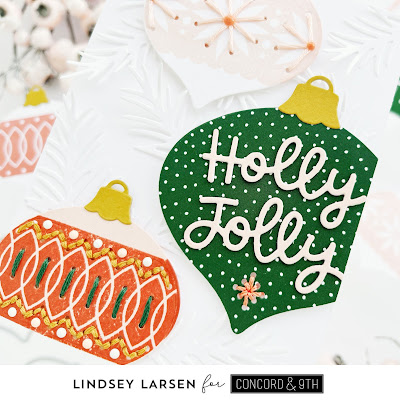
Next up are the ornaments, which come in two sizes.  
On the biggest ornament, I used the Ornament Stamp & Stitch Dies to die cut the evergreen polka dot patterned paper from the new Falala Patterned Paper Pack.  It's one of my favorite papers in the pack.
I added a cute sentiment from the set in Nectar cardstock, and then stitched on a little star/snowflake.  The die comes with three of these little stars that are aligned to go around a stamp that says "Let's be merry", but I just used a portion of the die on my ornament. 
Next up is the poinsettia ornament.  I stamped this one in Nectar and used a coordinating floss to stitch.  Then I added sorbet enamel dots to the centers. 
The final ornament is the most ornate and reminds me of something that my grandmother would have bought.  She decorated the most gorgeous trees each year, switching out the color schemes and ornaments she used. 
I stamped the ornament in Sorbet onto Nectar cardstock.  Then I stitched with evergreen and stardust floss (floss numbers below).  Finally, I added alternating white and nectar enamel dots.  It's a little tricky to see the color variation in the photos. 
If you are wondering which flosses I used to match, here they are: 
Nectar = DMC 967
Sorbet = DMC 3341
Evergreen = DMC 561 
Stardust = DMC 729 (I think you could probably find a closer match for this one, but when I bought floss, I hadn't planned on using this color, so I just had to choose from what I had on hand later.) 

That's all for me today!  I'll be back tomorrow with one my final project for Concord & 9th's Holiday Charm Release.  Thanks so much for stopping by!


SUPPLIES (with shoppable links)

cardstock & inks: Nectar, GrapefruitEvergreen, StardustFalala Patterned Paper Pack 

stamps: Ornament Stamp & Stitch Stamps 
dies: Ornament Stamp & Stitch Dies, Take a Bough Encore Dies 

extras: white enamel dotsnectar enamel dotssorbet enamel dots

Monday, September 18, 2023

Concord & 9th: Christmas Cloche

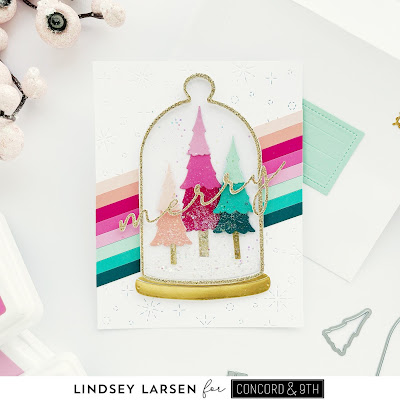
Good morning!  I am so excited to share this card with you today featuring Concord & 9th's Christmas Cloche Bundle.  I can't help but smile every time I look at it.  I think it's the combination of cheery colors and sparkle. 

You got a peek at this set on the nativity card I shared a couple days ago, but can I just say that the Christmas Cloche Dies are so much fun!  The size is nice and big, so you can fit lots of things inside, and they definitely gave you lots of great options in the die set.  

Shortly after I was married my grandmother gave me a set of tall, skinny trees with long trunks.  Each year I wonder if we need to graduate to a larger, fuller tree, but I can't bring myself to do it. I just love them so much!  So naturally I gravitated to using the layered tree in my cloche because it reminds me of our three Christmas trees.  There are three pieces to this tree making it ideal for an ombre look.

On my trees and the stripes behind I used (from lightest to darkest)  Nectar, GrapefruitCarnationSweet PeaDragonfruitSea GlassOceanside, and Peacock cardstock.  The trunk on the shortest tree is the size in the die set, and then I extended the length of the trunks on the other two.

This bright card begged to shine even more and Concord & 9th's Matte Gold Foil Paper and Gold Glitter Paper were perfect for the cloche and sentiment (which is also included in the Christmas Cloche Dies).  I added even more sparkle with glitter on the snowy drifts inside the cloche as well as filling it with both chunky and fine glitter.  The background mimics the sparkle as well with the Snowfall Card Front Die

One last thing to note is the envelope.  One of the extra die sets Concord & 9th release this month is the Lined With Love Dies.  I forgot to snap a picture of the inside of my envelope, but I used the Lined With Love Dies to line it with the cute nectar triangle patterned paper in the Falala Patterned Paper Pack. Then I used a few other dies in the set to dress up the front of the envelope with a stamp and label. These little stamp dies are so cute, and there are lots of options to carry you throughout the year. 

Now seems a good time to wish you a happy, shiny new week!  I have a few more projects to share this week with Concord & 9th's Holiday Charm Release, and I hope you'll come back to see. :) 

Sunday, September 17, 2023

Concord & 9th: Festive Corner Cuts

Happy Sunday!  The Concord and 9th Holiday Release fun continues. :) Today we are featuring the beautiful Festive Corner Cuts Dies.  This set is full of possibilities.  You can make beautiful, quick cards or detailed intricate designs.  It's totally up to you.  We'll start with a quicker option.  


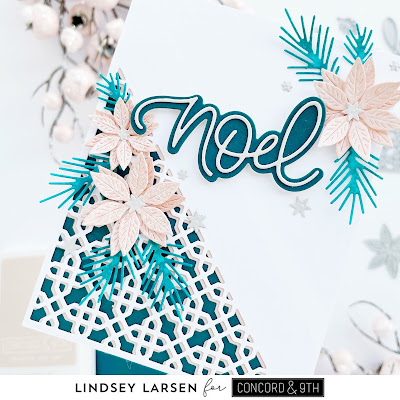
This card may look a bit familiar.  I loved the offset layering of the Festive Corner Cuts Dies on this card that I shared earlier this week, so I did the same thing but flipped the panel upside down.  Like before, I layered white on top of Nectar and Peacock cardstock.
I wanted to highlight that this set includes many other dies besides the decorative corner.  There are two shadowed sentiments.  Isn't this "noel" beautiful?  

I surrounded it with beautiful pines and poinsettias from the die set as well.  I spritzed these with different shimmer sprays and they are so pretty in person!  The poinsettia centers are quickly becoming a new favorite embellishment for me.  Every time I use them I feel like I'm scattering a little magic. 

Okay, on to a little more elaborate design.  The Festive Corner Die is really quite incredible.  I found that if you look at it for a while different designs and shapes will jump out at you, especially if you line the die up and cut it twice to make a square instead of a triangle.  And actually, I was pleasantly surprised with how easy it was to line up once I had cut one triangle out.  The alignment was nearly perfect the first go around.
For this card I chose to focus on the octagonal shape hidden within.  Filling in the design was a bit tedious, but it felt like I was creating a decorative tile design.  I used Nectar and Grapefruit cardstock for the octagons and added a few Peacock diamonds. 

After spending all that time building my background I wasn't about to cover up a single bit of it, so I chose the simplest card design ever, added a sentiment from Concord & 9th's Holiday Sayings Dies, and called it a day.

I had so many ideas and can't wait to have more time to use these dies.  I actually already have two more projects made that just need to be photographed.  Have a blessed Sunday, friends!  Thanks for stopping by!

Saturday, September 16, 2023

Concord & 9th: All Is Calm

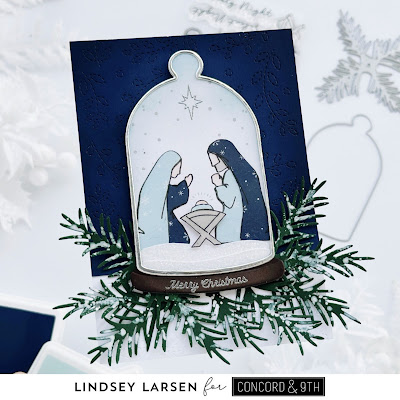
Good morning!  I'm back to share another lovely set from Concord and 9th.  Sharing this card with you today feels like inviting you into my home.  Well, my parents home actually.  Over the years my mom built quite the collection of nativities.  Looking at them each year was one of my favorite parts of Christmas.  One of them had the Holy Family inside a glass cloche.  At some point the glass broke, but it still comes out every year.  I thought of it immediately when I saw Concord and 9th's All Is Calm Bundle and the Christmas Cloche Dies and knew right away that I had to recreate it. 

I die cut the cloche, base, and snow (or sand in this case) then covered them with glitter. I stamped the Holy Family and used the All Is Calm Stencil Pack to add some color with pebble and nectar inks.  Then I paper pieced their clothes using papers from the Falala Patterned Paper Pack

I inked the edges of the the cloche with powder ink and the base with nutmeg.  Then I embossed a sentiment from the Christmas Cloche Stamp Set.  I also stamped some stars from the Christmas Cloche Stamp Set and the star from the All Is Calm Stamp Set
To complete the scene, I used the Stitched Vines Card Front Die on midnight and White Cardstock.  Then I placed a bunch of evergreen pines from the Take a Bough Encore Dies underneath the cloche because my mother usually weaves pines, poinsettias, and other greenery all around the different nativity sets. 

We are about halfway though the Concord & 9th Holiday Release.  Isn't it great that there is still more?  See you tomorrow, friends! 

Friday, September 15, 2023

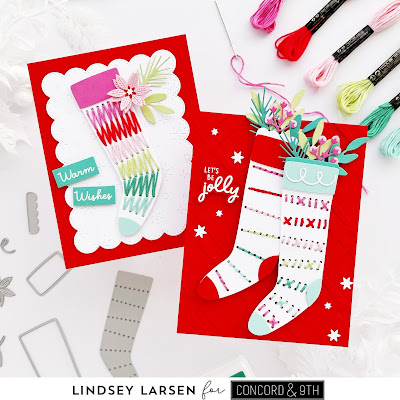
Stitched Stockings...Oh, How I Love Them!

Hello, friends!  I'll let you in on a little secret...the Stocking Stamp & Stitch Bundle is one of my absolute favorites from the entire Concord & 9th Holiday Release.  I love it so very much!  In 5th grade I went through a cross stitching stint, and now I'm wondering why I ever stopped.  I have stitched a time or two here or there, but I really love how easy it is to stitch a design on cardstock with precut holes.  And these dies do just that!


The Stocking Stamp and Stitch Dies made me so happy that I just had to use a bright color scheme.  I'm a huge fan of Melissa Bickford and she used these cheerful colors on this cute sign.  They translate to Concord and 9th's Sweet PeaPoppyPink Lemonade SproutOceanside, and Aqua Sky.  
And if you are wondering whether or not I took my Concord and 9th cardstock swatches to the craft store to make sure I had perfect floss matches, yes, yes, I did.  I had everything all laid out on the floor and thankfully another costumer who came to look in the same area just smiled, laughed, and was willing to carefully shop around me. It looked quite comical now that I think about it.  I should have taken a picture! 
In case this could save someone some time, here are the colors I used: 
Sweet Pea = DMC Floss 3806
Poppy =  DMC Floss 3801
Pink Lemonade = DMC Floss 963
Sprout = DMC Floss 15
Oceanside = DMC Floss 958
Aqua Sky = DMC Floss 964
I started my card with a bright Poppy base and layered the Plaid Card Front Thick Die on top.  Next I set about stitching up my two stockings.  I used the stitched lines in the Stocking Stamp and Stitch Dies for both stockings, only I die cut the lines twice on one of them.  This allowed me to vary the stitching patterns. 
I dressed up the stocking cuffs and then filled them with greenery from the Ornament Stamp and Stitch Dies (leaves in Sprout and Oceanside) and the Festive Corner Cuts Dies (pines in Oceanside).  I found that the berries from the from the Ornament Stamp and Stitch Dies are a perfect fit for the sprig/stem of little flowers in the Petal Pushers Dies, so I combined them to make the little berry sprigs on my card using Pink Lemonade and Sweet Pea
Finally, I embossed a sentiment from the Over the Rooftops Stamp Set and added a few stars from the Festive Corner Cuts Dies. (They are technically the poinsettia centers.)

I was having too much fun to stop, so I made a second card. 
This time I used a scalloped frame die from the Simply You Dies and added a little holiday magic with the Snowfall Card Front Die.
I did a zig zag stitch to cover the entire stocking.  It kind of looks like a knitted stocking to me. 
Afterward I added the toe, cuff and some greenery.  The poinsettia comes from the Festive Corner Cuts Dies.  The final touch was a sentiment from the Stocking Stamp & Stitch Stamp Set
What do you think?  I hope you love them as much as I do!  
Thanks so much for joining me today!  I'll have more to share tomorrow.  I hope to see you back! :)