Monday, November 30, 2020

Pretty Pink Posh: Merry Wishes

Good Morning!  I finally created my first Christmas card of the year....clearly I'm a little behind, but I am excited about the way it turned out.  I've used lots of Pretty Pink Posh goodness today.


I'm loving the decorations I see popping up around our neighborhood, especially the fun window treatments, so I used Pretty Pink Posh's Stitched Duo 3 die to make my own wintery window. After I die cut the window base I backed it with a layer of acetate on top of white cardstock.  
Next was the fun part.  I used modeling paste sprinkled with glitter to add snow to my window panes as well as some Pretty Pink Posh Pine Sprigs.  I was liberal with the glitter, so that extra stuck to the window adding to the frost effect.  If you zoom in reeeeeally close, you can see it. :) 

For the sentiment, I combined two of my favorite products.  I die cut "merry" from their Merry Christmas Script die and added "wishes" from the Simple Sentiments stamp set.  Pretty Pink Posh's Lattice Background is something I'm really loving lately, so I used that on my card base but left all the pieces intact.  It adds a great subtle texture.


Thanks so much for visiting today!  I hope you are off to the start of a great week!  

PS If you are shopping around on Cyber Monday today, Pretty Pink Posh is having a markdown sale with some products up to 50% off.  I don't get any kickback from this.  I'm just a true fan of the products and especially Paulina who runs the company, so I wanted to share. 

Thursday, November 26, 2020

25 Days of Christmas Tags - Day 26 (Bonus Day!)


Y'all, we made it!  Can you believe it?  We are on the last day of the 25 Days of Christmas Tags.  A whopping 53 tags later, and I'm sharing my very last tag with you today.   Our bonus sponsor (yay more prizes for you!) is My Favorite Things.  

As I was creating this tag, all I could think about is a celebration.  A celebration of the end of a crazy, fun marathon of sharing tags and celebration of the Christmas season that is upon us.  I was hoping to embody that happy, joyful feeling in this tag.
My tag is the largest size from MFT's Stitched Traditional Tag Stax and began with the colorful sprinkles at the bottom.  My cute mom likes to do art projects with the grandchildren.  One day she used confetti glitter nail polish with them to bedazzle a project, and I thought it was so fun.  She gave me a bottle of the nail polish, and that is what I painted across the bottom of the tag. 
Then, I searched my stash and used the brightest inks I own to match the colors and ink up a sentiment from Hand-Lettered Christmas.  This is an older MFT set, but one I still love. 
I continued the colors one more time to make a rainbow scarf for this cute pup from MFT's Deck the Howls Stamp Set.  I popped him up on the confetti covered floor and called it a day. 

Thanks so much for dropping by today and for all the other days you've stopped by this month!  You are much appreciated.  Also, I want to express many, many thanks to Tracey for organizing this incredible event.  There is SO MUCH WORK done behind the scenes to organize and put on this event.  It starts months before it even begins.  If you have a second, I would love if you would head over to Tracey's blog and give her a big thank you.  While there you'll surely be inspired by the fabulous tags being shared today, and you'll find all the details on how to play along.  Also, you'll have one more week to get your last tags in, so I hope you'll continue to play along!

Wednesday, November 25, 2020

25 Days of Christmas Tags - Day 25


Good morning!  Today is a little extra special because I'm playing double roles as both a Pretty Pink Posh Guest Designer and a member of the 25 Days of Christmas Tags Design Team.  

It's also special because I think the world of Pretty Pink Posh's owner.  Paulina is as genuine, kind, and generous as they come!  I followed Paulina long before her company was born, and she has amazed me by her goodness time and time again.  Being a guest designer for her has truly been a sweet blessing.  I just had to sing her praises today! 

Okay, now to share my tag.  I've really tried to maintain variety in my tags, but you may have noticed that I have a thing for poinsettias.  I really was going to go a different direction, but in the end I couldn't help but use Pretty Pink Posh's Stitched Poinsettias. 
I'm not even sure the name of this color (I'm going with magenta), but it's between a purple and a pink and I love it, especially when paired with navy.  Yes, the leaves are a deep navy (not black).  I originally used only the solid magenta color for the poinsettia but decided just to see what it looked like with a few polka dot layers mixed in...and I fell in love.  I cut the center with silver foil and added a Metallic Silver Jewel because I couldn't not put a Pretty Pink Posh embellishment on here. 
The poinsettia dies create a really large flower, but I wanted mine to fit on Pretty Pink Posh's Decorative Tag 2 Die, so I only used the smallest two petal layers (cutting the polka dot and solid color in each size).  I used a shimmery cardstock for the base and added a little decorative layer on top that I cut with Pretty Pink Posh's Lattice Background Die.  I simply trimmed out a square that would fit the center of my tag.  I really like when flowers are paired with geometric shapes, and the diamonds here give just a hint of that.  
I cannot believe that the 25 Days of Christmas Tags event is wrapping up.  I'm not sure that my body knows how to sleep anymore!  Ha!  It's been fun, and I've been so inspired.  You'll absolutely want to hop on over to Tracey's blog today.  I happen to know that both of my design teams did a fabulous job.  You won't want to miss seeing their tags!

Tuesday, November 24, 2020

25 Days of Christmas Tags - Day 24


Good morning!  I'm happy to be sharing another tag for the 25 Days of Christmas Tags.  This time, we are using products from Heffy Doodle.  Is there a cuter name for a stamp company?  I can't say it or even think it without smiling. 
After the last few labor intensive tags I was ready to go back to something a little quicker and more straightfoward.  I used Heffy Doodle's Santa's Village to create a little Christmas scene, and I enjoyed every minute of it. :) Do you ever get that way where you just need a simple, feel good kind of project?
The Santa's Village set has everything you need to create the cutest village, but I just loved the idea of Santra tromping around in the snow outside of town to hand deliver a gift.  I added a little tag stamped with a "A gift for you" from The Greetery's Speed Tagging Christmas Sentiments, you know, because Santa is out delivering a gift. :) 
I'm so glad you visited today!  It's been fun to see familiar faces pop up so regularly in the comments.  You all have been amazing!  Don't forget to pop on over to Tracey's blog to see all the other fabulous creations for today.  Lots and lots of cuteness over there!

Monday, November 23, 2020

25 Days of Christmas Tags - Day 23

Hello, friends!  Today for the 25 Days of Christmas Tags we are featuring a fun new-to-me company.
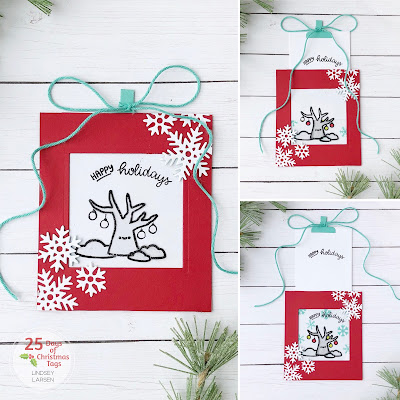
Today is all about stretching your stamps and getting creative.  I was kindly gifted Penguin Palace's My BFF (which at first glance is full of sweet spring images) and the Crystal Snowflakes stencil.  I toyed with using the little animals in the stamp set, but kept coming back to the barren tree.  The idea of having a tree get dressed up for Christmas made me smile, so I decided to make it happen.  
I've always been intrigued by magic color slider cards, and this was my first attempt.  I thought this would be a fun way to show the transformation, and let's just say it was a bit of a learning process.  It's definitely doable without any special dies (like I did here), but for ease and the sake of time, I think investing in the dies is a wise decision (wink, wink).  I looked at a picture of the Lawn Fawn dies and used that as a guide to create a folded pocket with a slit at the top that the white tag slides up through revealing the colored image below. 
Second note of advice, there is such a thing as embossable plastic sheets.  Definitely worth it to get them.  I did not have any, and I won't tell you how many times I had to emboss on this clear cardstock to try to get it to work without warping the plastic too much.  And in truth I still ended up having to trim out portions and glue them on top of another unmarred plastic sheet.  Live and learn, friends.  Live and learn.  I think throughout this process I adopted the Little Engine That Could's motto of "I think I can!"
But in the end that sweet little tree did end up in a happy, colorful scene.  I stamped some tiny circles and turned them into hanging ornaments and used the smallest snowflakes in the Crystal Snowflakes stencil to add color to the background.  The sentiment is a combination of "happy" from the Penguin Palace's My BFF set and "holidays" from Sunny Studio's Hedgey Holidays.  Now under normal circumstance I would have embossed the sentiment on the clear cardstock, so it was visible whether in the color reveal version or not, but I didn't have it in me to fight the embossing any more.  So...when the tag is opened you get to see the sentiment twice.  Just consider it my way of wishing you a doubley happy holiday. :)
Moving on. :) After I finished stamping the panel and adhering it on the inside, it was time to dress up the outside of the tag.  Since this tag is all about revealing a surprise, it seemed fitting to make the outside look like a gift.  A few snowflake die cuts and a big bow on top and voila!  A gift. 
Thanks for sticking with me through the journey of this tag!  I hope you had some smiles and laughs along the way.  I know I did.  And maybe this little gift will inspire you to make something.  But if not, no worries!  Head on over to Tracey's blog for a bunch more inspiration options.  I hope you have fun creating...even if it includes some learning along the way. ;)

Sunday, November 22, 2020

25 Days of Christmas Tags - Day 22


Hello!  It's our fourth and final week of the 25 Days of Christmas Tags.  Crazy, right?  Today's sponsor is Erin Lee Creative.  She has some really unique stamp designs, and my tag today uses Aztec Antlers and Holiday Sentiments stamp sets. 

When I started making this tag, I had a clear vision in mind. I was going make a shape tag and emboss the deer in gold on a sheet of vellum.  I wanted it really light and airy.  Well, obviously I didn't end up sticking with that plan, and it all started with the embossing powder.  Instead of plain gold I decided that Midas Touch Wow embossing glitter would be even more beautiful.  Looking at the glitter reminded me of this card by Dawn Woleslagle...it's one of those cards that you just never forget.  And that's when I decided I needed to do a dark background...and then I pretty much ended up with a simplified CASE of Dawn's card. But it just fit the design of this stamp so well.

I started by blending Broken China Distress Oxide Ink in the center of my panel.  Working outward, I added Faded Jeans Distress Oxide Ink and Black Soot Distress Ink.  When all the ink was good and dry, I embossed an image from Erin Lee Creative's Aztec Antlers stamp set and a sentiment from ELC's Holiday Sentiment's stamp set.  I promise you in real life that the sentiment is crisp and readible...just doesn't look so much like it here.  
One of the things I loved about Dawn's card so much was the "messy" foiled edges.  I did a really simplified version here and simply took pinches of the midas touch embossing glitter, sprinkled them around the borders of my tag, and embossed to set them.  A tip for using this glitter: It will literally blow away because of the power of the heat gun, so I always heated the backside of the paper first to start the melting, then I heat sent the front.

Well, folks, that's all for me today.  I have to say, I was really happy with how this turned out.  It's so different from anything I have created so far.  As always, you can find more inspiration over on Tracey's blog.  I hope you are having a beautiful Sunday!  

Saturday, November 21, 2020

25 Days of Christmas Tags - Day 21


Good morning!  Today we're featuring products from Studio Katia, and I've got a fun interactive tag to share with you.

I used Studio Katia's Slider Tag dies.  I watched Tracey McNeely's video here on how to put the interactive tag together, which was really helpful, and actually the process is very easy.  This is a tag that I definitely see myself making a lot.  My kiddos love interactive tags. 
This tag comes in three pieces - a large front tag that has a window opening, a large base tag that reveals as the window opens, and a smaller tag that essentially pulls the window open.  As I was cutting the various pieces for the tag, negative polka dots fell out, so I decided to keep them and cut a bunch more to decorate the front of my tag.  
When you cut the front tag it cuts and scores the window at the same time, so I found it best to stamp first, then cut.  This sentiment is from Studio Katia's Poinsettia Border, and I stamped it ever so slightly in an ombre fashion using Altenew's Rubellite and Razzleberry inks.  Such pretty colors!  Okay, now here's the fun part...
When you pull the tab, the window slides open to reveal the cute scene inside.  To create my scene, I blended a light aqua ink on the base tag, then I added a few pencil colored images from Studio Katia's cute Holiday Village stamp set.  
The smaller middle tag is the mechanism that you pull to open the window, but you can also decorate it.  I kept it simple and added "for you" which is also included in the Slider Tag dies.  I love that these script dies look like a hand written message inside the tag.  
Fun, huh?  Thanks so much for visiting here today! I hope you have a wonderful weekend made even better with some crafty time.  If you're looking for inspiration, Tracey's blog is a great place to start.  We'd love for you to join the tag making fun! 

Friday, November 20, 2020

25 Days of Christmas Tags - Day 20


I'm so excited to share today's tags.  I have been a huge fan of The Greetery right from the start because I have been a huge fan of Betsy for a decade now.  Everything she does is quite simply amazing.  She wows me time and time again.  I can't speak enough about her kindness, generosity, and shere creative genius.  

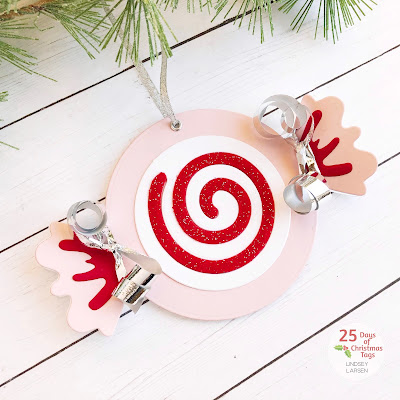
Today I'm sharing a bunch of tags using The Greetery's Candy Pops Circle Dies.  These dies are so brilliantly designed and so easy to use.  I'm 100% a fan.  My first tag will accompany a hot chocolate gift.  It is full of yummy toppings to add a little something extra to the hot chocolate.  I used a greeting from Candy Pops Sentiments and the bubble option for the Candy Pops Circle Dies.

I used two 1/4" circle bubbles placed back to back to accomodate the puffy marshmallows, but The Greetery also sells 1/2" bubbles.  I like how this option is see through on both sides; however, next time I think I would use the 1/2" bubble.  The deeper bubbles would allow for a solid cardstock backing that you could cut with The Greeter's Tear Away Circle Die (allowing the recipient to open the contents with just a little pull of the tab).  

Next I wanted  to show how you could use the dies even without the bubbles.  This is also a really fun option.  I wanted to add a little texture to these, so the darker green and red details are cut with stiff sparkly felt.  You can't find as many color options in the stiffer felt, but it cuts SO easily that I use it when I can.  
These tags are more like shaped cards in that they open up and reveal a message inside.  I stamped the Merry Christmas and Merry & Bright sentiments from the Speed Tagging Christmas Sentiments in an ombre style inside...BUT I accidentally deleted all the pictures I took showing you that fun detail. I know, I know....I couldn't believe I had done it either.  (Where's the emoji with the girl smacking her forhead when I need it?) 
Moving on to happier accidents.  I started cleaning up after making my tags, but I had so many leftover pieces from fiddling with colors and such.  As I looked at the pile my mind immediately saw ornaments.  It's a little bit of a stretch, but I had to do it.  Better to make four more tags than toss these pretty cuts (or hang on to them for who knows how long).  
I wanted the ornament tags to still remind you of candies and sweets, so I added lots of chunky glitter.  
I also added some super fun trim.  I have no idea what to call it.  It's something I randomly found in my mom's trimmings drawer 5 or 6 years ago.  It is sparkly and fun, and I just love it.  
The glitter, sparkle, and colors of these tags remind me of candy ornaments I might have found on my grandmothers' Christmas trees.  
And here's the whole pile of candy goodness all together.  

Thanks so much for visiting today!  You guys leave the sweetest comments that truly brighten my day.  Thank you!  Speaking of ways to brighten a day, make sure you head over to Tracey's blog next.  The Greetery has such a powerhouse design team.  Their tags are so inspiring!