Saturday, March 30, 2024

Pretty Pink Posh Bunny Face - Two Ways

Good morning!  I have two Easter cards to share using the darling Bunny Face Shaker from Pretty Pink Posh that released this month.  I thought it would be fun to make a little boy bunny and a little girl bunny, and I think they are equally adorable.

I created a shaker card for my first Easter Bunny.  I started with a  sea glass card base and layered multiple layers of the Elegant Heart Banner Die on top.  Then I filled it with the new Springtime Shaker Beads.  I always love the way the beads sound in a shaker!
In the center I added the Bunny Face Shaker using wheat cardstock with white and nectar details.  Doesn't he look cute with that little bow?  (It's from the Birthday Treat Box Dies.)

Finally I created a frame around the bunny using some little eggs from the Big Easter Cupcake Dies in lemon tart, nectar , and tidepool
Next up, a little girl bunny card.  Although it actually isn't very little.  The first card is A2 size, but this one is a large A7 size. 

I wanted this one light and bright.  To make her a little girl bunny, I gave her a flower crown using the new Spring Mug Additions Dies

I created a colorful background using the Easter Egg Border Die and used a vellum circle cut with the largest Eyelet Circles Die, so the sweet bunny would still stand out from the busy background. 

Then I embossed a sentiment from the previously released Easter Wreath Stamp Set onto a rounded stitched rectangle found in the Big Easter Cupcake Dies. Finally I framed the sentiment with two tulips from the Spring Mug Additions.

These cards are finally in the mail, so hopefully they be bringing smiles soon.  Thanks so much for joining me today!  I hope you have the most wonderful Easter weekend! 


Card Supplies: (all Pretty Pink Posh unless otherwise note)

EASTER BUNNY CARD

Bunny Face Shaker

Big Easter Cupcake Dies (eggs)

Birthday Treat Box Dies (bow)

Elegant Heart Banner Die

Springtime Shaker Beads

Cardstock: (Concord & 9th) Sea GlassNectarTidepoolWheatMushroomOceanside; (Papertrey Ink) Lemon Tart


GIRL BUNNY CARD

Bunny Face Shaker

Spring Mug Additions Dies

Big Easter Cupcake Dies (sign)

Eyelet Circles Dies

Easter Egg Border Die

Easter Wreath Stamp Set

Cardstock: (Concord  & 9th) LilacMushroomNectarPink LemonadeSea GlassSproutTidepool; (Papertrey Ink) Hibiscus Burst, Lemon Tart 

Thursday, March 28, 2024

Papertrey Big Bloom Take 2

 Hello, friends!  I'm back with another card using the gorgeous Into the Blooms: Big Bloom Die by Papertrey Ink.  One card just wasn't enough.  :) 

This time I went much less dramatic, with a simple design and soft color palette.  I actually used many of the same products including the new Just Notes Stencil Collection to create the grid pattern behind the big bloom. 
I know this flower can be colored to look like many other varieties, but I couldn't help patterning it after another beautiful garden rose.  I blended Papertrey's Harbest Gold and Lemon Tart inks for the yellows, and Cordord and 9th's pink lemonade for the pink edges.  The leaves were a mix of C9's sproutgrasshopper, and avocado inks.
To get the torn look across the bottom of the paper I used a fun edge die in the Just Notes Dies and chose a sentiment from the Just Notes Stamp Set.  It's a fabulous collection with so much to offer.  I'm a huge fan!
Thanks so much for taking the time to stop by today! 

Wednesday, March 27, 2024

Papertrey: Big Bloom

Good morning!  I'm excited to start sharing some of the cards I've made guest designing with Papertrey's newest release.  One of the first things I noticed when I opened my box was the Into the Blooms: Big Bloom Die.  It's, you guessed it...a big bloom.  And it's gorgeous! 

It's a bit of a chameleon of a bloom, too, and can look like a lot of different flowers depending on how you color it.  Papertrey's Design Team's samples have been amazing!  Though it isn't necessarily meant to be a rose, I chose to color it like it was one.  

I can't tell you the name of the rose, but I know my grandma could. :) She loved roses and grew more varieties in her yard than I could ever hope to remember, but she could tell you the name of each and every one.  

I inked up the Into the Blooms: Big Bloom Die with Concord and 9th's buttercup, pink lemonade, and  dragonfruit inks as well as Papertrey's harvest gold ink.  The leaves were a mix of C9's sprout, grasshopper, avocado, and clover inks. I added a couple leaf sprigs from Papertrey's Into the Blooms: Clover Dies and a sprinkling of enamel dots

On the upper panel, I die cut the bottom with the pretty Elegant Edges: Flourish Die.  Then I stenciled on the diamond-ish stencil from the Pro Stamper's Box: March and blended white around the edges to soften things up. I used the new Just Notes Stencil Collection to create the grid pattern on the bottom card base.

I finished the card by embossing "Mom" from the Mother's Day Sentiments Stamps Set and a secondary sentiment from the Just Notes Stamp Set.

Thanks so much for visiting today!  I'll be back to share more projects this week. :) 

Tuesday, March 26, 2024

Papertrey Ink March Release Insta Hop

Hello!  I'm overjoyed to be joining Papertrey Ink this month as a guest designer.  Never in a million years did I ever think those words would be coming out of my mouth.  It is such an honor!  I purchased my very first acrylic stamps from Papertrey.  SO many of my most favorite designers have been part of the Papertrey team over the years. To say I am a fan is an understatement. 

Today I am joining a fun Insta Hop with them and of course there is a giveaway. Make sure you head over to my Instagram account, so you can join the fun.  

I've made lots of cards with Papertrey's March release, and I'm excited to share them all with you, but I'll start with my husband's favorite. :) Papertrey's Pro Stamper's Box for March has beautiful layering flowers and frame dies.  I couldn't wait to ink them up!  And I wanted to use lots of them, so I made an extra large A7 size card.  

I started by die cutting several of the elongated hexagon frames from the Pro Stamper's Box dies.  After arranging them on my card, I set to work stamping lots and lots of flowers. 

I inked them up using a bunch of Papertrey inks.  Starting in the center row, the flowers are Hibiscus Burst and Raspberry Fizz; Saffron Spice and Honey Nut; Spring Rain and Enchanted Evening; Sweet Blush and Pale Peony; and Autumn Rose and Royal Velvet.  The leaves and stems are Ocean Tides and Pinefeather. 


I embossed two Sentiments from the new Just Notes Stamp Set (love it!) on pinefeather cardstock and die cut it with some coordinating dies and called it a day. :)  Thanks so much for visiting today!  Don't forget to visit my Instagram account, so you can join the Insta Hop.  You will surely leave inspired and you just might leave winning a gift certificate, too. :) 

Monday, March 18, 2024

Concord & 9th: Folkart Florals Turnabout


Good morning!  It's been a bit of a marathon week, and today is my last day guest designing with Concord and 9th.  I have loved every minute!  Today we are sharing the Folkart Florals Turnabout, but you have seen me use this set many times throughout this week.  Remember these?


You can find them here, here, and here.  The look of the Folkart Florals Turnabout can change considerably depending on whether you stamp 1, 2, 3, or 4 colors, your color combination in general, or whether or not you stamp the full turnabout or if you remove one of the pieces and just stamp the inside or the outside portion of the turnabout (like I did on the Meg card).  The Meg card also uses the fun sentiment blocks included in the Folkart Florals Turnabout stamp set. 

For today's card I stamped the entire Folkart Florals Turnabout in four cheerful colors:  creamsicleoceansidebriar rose, and buttercup.   
I kept the card simple to really let that fabulous floral background shine and added just the little Spring Bunny holding a giant, oversized bloom from the Build-a-Bloom Dies
The flower is a combination of carnationbriar rose, sea glass, and oceanside.

I simple "hi" from the Just Say More Dies and the card was good to go. 
Thank you so much for joining me this week!  It has been a blast to share cards made with this fabulous new release by a company that I love so much.  Have a happy week, friends!

HI, BUNNY CARD SUPPLIES:

Folkart Florals Turnabout

Spring Bunny Bundle

Spring Bunny Stamp Set

Spring Bunny Dies

Build-a-Bloom Dies

Ink/Cardstock: creamsicleoceansidebriar rose, buttercupsea glasscarnation. pebble (bunny)

Sunday, March 17, 2024

Concord & 9th: Just Calling

Good morning!  I have another super fun Concord & 9th bundle to share today called Just Calling. Besides the fact that the rotary phone is super cute, it can also be turned into an interactive card.  It is so much fun! 

I wanted the rotary phone to take center stage, so I kept the background light and stamped the the Folkart Florals Turnabout in just two colors - pink lemonade and ballet pink

I added the scalloped circle from the Spring Bunny Dies and used the Just Calling Stamps and dies to assemble the rotary phone in pink lemonadeballet pink, and gold
Now here comes the fun part.  There are 10 spaces to stamp messages on the rotating piece and lots of options to customize your message.   On the rotating piece, I stamped a few sentiments/images from the Just Calling Stamp Set and then looked through my stash to find a few more.  Some that I used were "xoxo" from Just the Ticket and "you've got this" from For the Record.  
I can't tell you how many times that I have turned the dial to reveal all the messages.  Lets just say, it's been a lot. 

Thanks so much for visiting!  I hope you have a happy St. Patrick's Day!

CARD SUPPLIES:

Just Calling Bundle

Just Calling Stamp Set

Spring Bunny Dies

Folkart Florals Turnabout

For the Record

Just the Ticket 

Cardstock: matte goldpink lemonade,  ballet pink

Saturday, March 16, 2024

Concord & 9th: Spring Bunny

Happy Saturday, friends!  Today I'm highlighting the super cute Spring Bunny set by Concord and 9th.  I love that they designed it to work not just for Easter but beyond.  

I started by stamping the Folkart Florals Turnabout in powdernectarpink lemonade , and eucalyptus.  Then I carried those same colors over to stamp several images from the Spring Bunny stamp set.  
Instead of using the big scallop circle in the Spring Bunny Dies, this time I opted to build my scene inside the cloche from Concord & 9th's Christmas Cloche Dies.  I added a tulip from Tulip Festival for a little height and used balsa wood for the cloche base to add some texture. 
Last up is the sentiment.  The sentiments in Spring Bunny are curved, but if they don't quite work for your design, don't forget the you can bend and change them.  I did that here to fit on a banner from Whimsical Wings.

And that's all folks. :) I hope you have a wonderful weekend!  Thanks so much for stopping by today!


CARD SUPPLIES:

Spring Bunny Bundle

Spring Bunny Stamp Set

Spring Bunny Dies

Christmas Cloche Dies

 Tulip Festival 

Whimsical Wings

Folkart Florals Turnabout

Ink/Cardstock:  eucalyptusnectarpink lemonadepowder, wheat

Friday, March 15, 2024

Concord & 9th: Tulip Festival

Good morning!  I'm back with more Concord & 9th goodness to share.   Today we are showcasing the gorgeous Tulip Festival Bundle

There are three different tulips included in the Tulip Festival Dies, so I die cut them all plus some extras.  Although there are only three tulips in the dies, you vary them a lot by depending on how you glue the tulip pieces together, making some look more or less open. 
I recently got Concord & 9th's new inks, and I used four of them on today's card.  They are gorgeous!  I used eucalyptus and rain forest on the leaves and stems, varying how light or dark I blended on the colors.  The tulips are watermelon and wildberry.  

I splattered gold paint onto the large oval in the Friendly Florals Dies and placed the tulips on top.  Then I embossed a sentiment from the Tulip Festival Stamp Set in gold onto a banner strip (found in the Over the Rooftops Dies). 
Finally, I used the Festive Corner Cut Die on my card base and backed it with rain forest cardstock
Thanks so much for joining me today! We're about halfway through the Concord and 9th March Release, so make sure you come back tomorrow. :) 

TULIP CARD SUPPLIES:Tulip Festival Stamp Set

Thursday, March 14, 2024

Concord & 9th: Carpe Denim

Hello!  I'm back to share Concord and 9th's Carpe Denim Bundle.  The name makes me giggle and I see a lot of denim jackets in my neck of the woods, so I got a kick out of designing several jackets for today's cards.  This bundle also brought back childhood memories of decorating Barbie's denim jacket with puffy paint, jewels, and ric rac.  Good times.  I totally plan to die cut jackets and let my girls design their own.   

Speaking of my girls, the first card I made is for one of them.  She is happy and creative and loves bright, happy colors and cheerful things.  I can usually tell where she has been because of the creative messes she leaves behind.  This card is a bright, happy, creative "mess" in her honor. ;) 

I cut the jacket from oceanside cardstock and covered it with lots of cute patches from the Carpe Denim stamp set.  I personalized it with the Perfectly Penned Stamp Set (an oldie but goodie). 

The background is the outer portion of the new Folkart Florals Turnabout.  I stamped it in oceansidebriar rosewatermelon, and buttercup.  Then I stamped the sentiment (also from Folkart Florals Turnabout) in the same colors. 

Ok, hold onto your hats for this one.  It's is as girly as it gets.  And it is a lot...like a lot a lot.  I created a congratulatory card for a bride, using the custom hand painted bride jackets I see floating around as inspiration. 

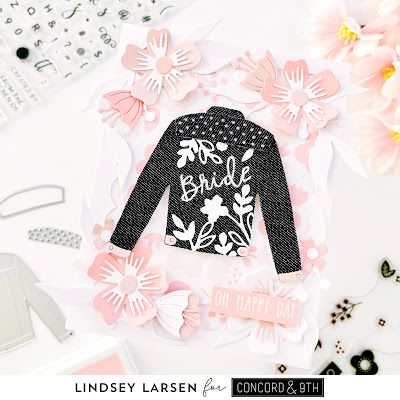
I made a true denim jacket using a denim patch.  It die cut perfectly!  I used Perfectly Penned again to emboss "bride" onto the jacket.  (Just a note: The fabric absorbed a lot of the embossing powder, so I did have to go over all the letters with a white gel pen)but that only enhanced the hand painted feeling.) Then I decked the jacket out with leaves and flowers using the Delicate Blossoms Dies.

Remember how I said this card is a lot? (insert laughing emoji) I used the Folkart Florals Turnabout to stamp the floral background, stamping in just two colors - pink lemonade and ballet pink. Then I framed it with the negative of the scallop frame in the Simply You Dies and decorated it with flowers and leaves from Build-A-Bloom.   I finished a card off with a fitting sentiment from ???. 

For my final card, I decided to go in a completely different direction and turned the Carpe Denim Dies into a letterman's jacket.  I have lots of teenage nieces and nephews, and customized this for one of them using their team colors - eggplant and sunflower.

I die cut the jacket three times, fussy cutting the pieces I needed, so the arms could be white and the bottom of the purple jacket could also have the yellow trim.  The collar and cuff details are separate dies, so that was easy.  To make them look like the striped trim you typically see, I used a white gel pen to add stripes.  
I pulled out my trusty Perfectly Penned Stamp Set for the name and added their number using the Cutie Pie Alphabet Dies.  The sentiment and stars come from the Carpe Denim Bundle, and I added a bit more color to the background using the Rainbow Card Front Dies.
Thanks so much for visiting today!  I hope that you leave inspired. :)


MEG CARD SUPPLIES:

Carpe Denim Dies

Perfectly Penned Stamp Set

Folkart Florals Turnabout

Cardstock/Ink: briar rosewatermelonbuttercupoceanside


BRIDE CARD SUPPLIES:

Carpe Denim Dies

Simply You Dies

Delicate Blossoms Dies

Build-A-Bloom Dies

Cardstock/Ink: pink lemonadeballet pink


LETTERMAN'S JACKET SUPPLIES:

Carpe Denim Stamp Set

Carpe Denim Dies

Rainbow Card Front Dies

Cardstock: sunflowereggplant