Friday, December 31, 2021

Thank You ( Christmas Plaid)

Hello!  I thought it would be a good way to close the year by saying thank you.   Thank you to you friends who are sweet enough to stop by to see what I create, to Paulina and the Pretty Pink Posh family who have given me so many opportunities to create, and to God for His many blessings this year. 

This card was also an excuse to use the Christmas scraps I had lying around.  Plus, I didn't get to make nearly as many Christmas cards as I had hoped this year (and sadly only one made it in the mail...lots of sickness around here this month), and I'm not quite ready to say goodbye to these colors. I got out my beloved Pretty Pink Posh Simple Stripes die and cut Concord & 9th's poppy, parsley, and clover cardstock as well as a shimmery silver scrap.  

To be honest there really isn't much rhyme or reason to the plaid design.  I just used the scraps I had and glued stripes here and there while I was watching a Hallmark movie :) until I had the whole panel covered.  I finished the card by die cutting the thank you script die and handcutting a border around it.  It's super simple, but I couldn't bear to cover up any of that plaid. Trust me, I tried, but I just ended up pulling everything off that I attempted to put on and left it as is.  

Thanks again, friends!  Wishing you all an abundance of blessings in the new year!!!

Sunday, December 26, 2021

Merry Christmas! + Poinsettia Tag

Hello!  I hope that you had a wonderful Christmas full of love and hope.  I'll be brief, but I just wanted to share a little closer look of the tag that was part of the packaging I shared a few days ago.  
I created it with two of my all time favorite Pretty Pink Posh products - Stitched Poinsettias and Fall Foliage, which I am convinced could be use any time of year.  Last month I covered a card base with the Lattice Background Die and cut out the center, so I could make a shaker.  I saved the center circle and turned it into this ornament tag.  I just eyeballed and handcut the ornament topper.  After I pieced together the poinsettia, I added some Metallic Silver Pearls to the center to finish it off. 
A very simple design, but it makes me smile lots!  It's one of my favorite things I have created this year. Thanks so much for visiting today!  Wishing you a lovely rest of your weekend!
 

Friday, December 24, 2021

Simple Christmas Packaging

Good morning!  This Christmas season I have been enjoying crafting outside of the card realm.  I've mostly been making ornaments (or really I've been making kits so my kiddos' classmates and cousins could make the ornaments).  As I was digging into my long neglected craft stash, I came upon these wood chalkboard clothespins that I purchased from Target's dollar spot a good 5 or 6 years ago.  When I saw their size I immediately thought of Pretty Pink Posh's "Circles" line, and to my delight, they were a perfect fit!
The package came with 6 clothespins, so I embossed each of the images from the Winter Circles stamp set. I decided to create some simple packaging using some envelopes and bags I've had in my stash for years!  (Can you tell I'm in the use it or lose it mode here?)  For my first set, I decided to stick with natural elements.
I wrapped some large kraft envelopes with twine, added some leaf sprigs from the Fall Foliage die set, and finished it off with one of the wood clothespins. 
While I was pulling things out I stumbled across a paper doily, so I folded it over the top of the second envelope.  Then  I tied a bow with twine, and added a clothespin and some leaves like before.  This was the first package my daughter snatched up to put her homemade gift in for her cousin. 
Next, I totally switched gears and went from neutrals to bold black, white, and red.  I also pulled out the Stitched Poinsettias die.
I die cut three layers for each poinsettia, and added polka dots to some of the layers.   It was quick and easy to do with a gel pen. 
I tied twine bows and added a clothespin and that was that.
The final set was the the quickest and easiest (even though each of these designs only to a few minutes to put together).  I die cut several pine sprigs and blended on darker green ink, so there would be a bit of color variance.
I simply arranged the pine sprigs and clothesepinned them on.  Easy peasy! 
It was so much fun making these, and even more fun filling them with little gifts.  It's creations like these that I find particularly rewarding.  
Here's one last shot of them altogether.  
Well, I'm off to do some Christmas cooking.  Thank so much for taking a peek!  Wishing a blessed Christmas full of peace, hope, and love! 

Monday, November 29, 2021

Snowmen Tags

Hello!  I'm super happy to share today's project with you.  Each year I try to make a special tag or two for my children's gifts.  Though simple in design, I have the most fun trying to put a little personal touch on each one. 


I started by cutting the snowmen out with Pretty Pink Posh's Snowman Shaker Die, choosing colors that I knew my kiddos would enjoy.  All the papers came from Concord and 9th and as luck would have it, Pretty Pink Posh's  Luau Jewels Mix had colors that coordinate quite well with each one. 
I used clover and sea glass cardstock for the green snowman.  
I knew my son wouldn't appreciate a lot of embellishing, so I added a little twine to the hat and tied a simple knot in his scarf.  
For my blue snowman I used oceanside and aqua sky cardstock.  
This child would most definitely appreciate embellishing, so I pulled out a small strand of sequins that I have held on to for years and used that for her scarf and for the trim on the hat.  Then, I made a layered flower using a white flower and blue sequin from the 6mm Springtime Mix Sequins and another jewel.  
 Finally, for my pink snowman I used honeysuckle and ballet slipper cardstock.  
I embellished the hat with another layered flower using the 6mm Springtime Mix Sequins, but my favorite part on this snowman is the scarf.  I wanted to make each snowman unique, so for this one I braided three strands of twine loosely together hoping to make it resemble a knit scarf.  
And now one last shot of them all together...
These are the kind of projects that make me the happiest - creating something special and taylored to the ones I love best. I'm glad you stopped by today.  I hope you have a wonderful, creative week!

Sunday, November 28, 2021

Christmas Candle

Good morning!  This card has been a long time coming...as in I made it more than two months ago.  First, a little backstory.  One of the things that I love about the area we live in is that people still decorate with wreaths on all their windows and candles in the windowsills.  It is something I've always loved, so I smiled immediately when I saw Pretty Pink Posh's Winter Candle Die and Christmas Candles Stamp Set.  I paper pieced the Winter Candle Die right away, made my card, and attempted to photograph it...three times.  I finally got decent enough photos, edited them....and then accidentally deleted everything.  I was so frustrated I put the card away, and didn't pull it out again until this weekend.  So here we are!  
The card itself came together pretty quickly.  After making the candle, I mounted it on a banner and stitched across the top.  I used the Layered Holly Stencils to create my background, and finished it off with a sentiment from Christmas Candles Stamp Set.
Thanks so much for visiting today and listening to me ramble.  Have a blessed Sunday! 

Saturday, November 27, 2021

Christmas Joy

Happy Saturday, Friends!  We are pulling out the Christmas decorations today, and this card expresses exactly how I feel.  My heart is full of Christmas joy!  I think Thanksgiving is the most perfect holiday to precede Christmas.  There could not be a better transition into the Christmas season than having a heart full of gratitude. 

Last year I made a couple Christmas cards in red, white, and silver (you can see them here), so I decided it would be fun to make a new card in the same colors this year.  I pulled out some old and new Pretty Pink Posh products and got to work.  I started with Lattice Background Die.  After die cutting it, I cut a large circle out of the middle, so I could make my card a shaker.  I filled the shaker with Sweetheart Rhinestones, removing the pink ones to save for a later project.  These rhinestones make the best sound when you shake them!

I wanted to pull in some of the elements from last year's cards, so I used poinsettias and pine sprigs, but this time I used Poinsettia Corners Stamp Set and Dies.  I embossed it in white on vellum and backed it with white cardstock.  I used the Pine Sprigs Dies and Fall Foliage Dies to create a little extra foliage, and then adhered the arrangement to my card.  I think Christmas makes me want to decorate even my cards more, so I added Cherry Red Pearls and Metallic Silver Pearls to the centers of my poinsettias.  

I finished off my card by silver embossing two sentiments from the Holiday Scripts Stamp Set and cutting them out with the coordinating dies.  It never ceases to amaze me how easily and perfectly these dies align with the scripty words.  Well, that's all for me today.  I better head back to the Christmas decorating and there's the last slice of a lemon meringue pie calling my name. :)  Have a lovely weekend, friends!

Friday, November 19, 2021

Playing Cards with Michele!

Good morning!  Today is such a fun day.  My dear friend Michele has invited me to play cards with her. Isn’t that the best idea?  Michele has got to be the friendliest kid on the block.  I sure hope you’ve had the chance to connect with her.  Her whit, laugh, sincerity, and hugs are second to none.   I’ve had the absolute pleasure of meeting her in person, so I thought of her happy smile and heard her voice in my mind while I was making my card.  I couldn’t stop smiling!

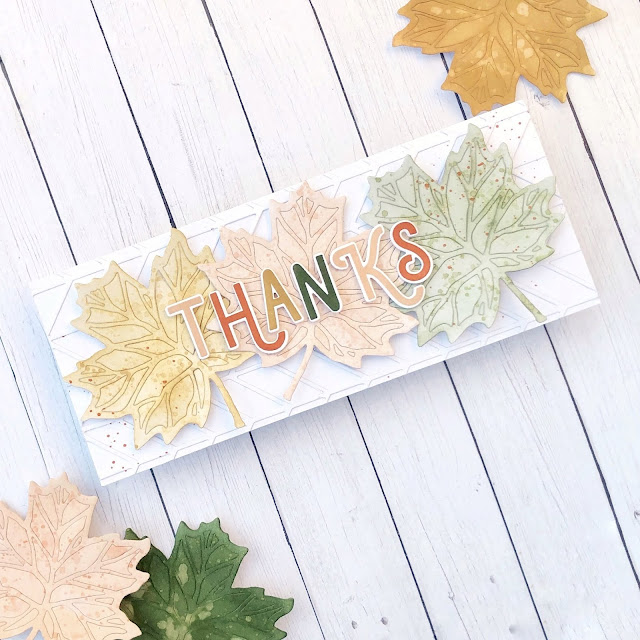
We are both creating cards with the theme “Giving Thanks + Leaves”.  I was delighted when she told me the theme because leaves are my favorite.  I combined older, retired, and brand spankin’ new products on my card. I started with Concord & 9th’s Thankful Leaves die and die cut it 3 times being careful to not pop out any of the pieces.  I pulled out some Pigment Craft Co inks (SO excited about these!) and blended on Seagrass, Glow, and Monstera inks using a very light hand.  As a reference for colors, the leaves in the photos not on my card are those same colors with a heavier hand blending.    One of my favorite parts about the leaves that fall in autumn are the speckles and splotches of color on them, so I used the same inks + Quince ink to add speckles onto my leaves.
Next I pulled out Pigment's Festive Fonts stamp set and dies and stamped "thanks" in their Quince, Fig, Seagrass, and Monstera inks.  I cannot tell you how much I love these colors and stamps! They are technically my Christmas present from my parents and my husband, but both gave me permission to use them early.  I just couldn't wait!  But no worries, I'll wrap them and put them under the tree when the big day arrives.  
At this point I felt like the card needed just a little something, but I have very few slimline products.  I pulled out an old (but still loved) Lil' Inker Designs Pieced Chevron die and partially die cut it, then I scooted it over and die cut again, which allowed me to cover the whole 3.5x8.5" size I needed.  And finally I splattered on some fig ink toward the edges of my card.  Such a small step, but honestly the card isn't complete without it.  
Well, that's all for me folks!  I hope you like it as much as I do!  Now make sure to head over to Michele’s blog to see her card.  It’s a surprise for me, too, and I can’t wait to see what she made.  I’m sure it will knock your socks off! :) 

Friday, November 12, 2021

Waffle Flower - Unexpected Holiday Colors Challenge

Hello!  I was delighted when my dear friend Jeanne Jachna invited me to be her guest for the Waffle Flower November Challenge.  The theme for November is "The Most Wonderful Time of The Year"  and our special twist this week is holiday cards in unexpected colors.

Hopefully by now you know that creating color combos is one of my favorite things to do, so I challenged myself to come up with not only unexpected colors for Christmas, but also a color combination that I had never used before. I had a few ideas in mind but settled on chocolate brown, teal, and warm orange-ish yellow. (How's that for a color description?  Ha!)  

I made a quick and easy card that could easily be mass produced.   By using a classic Christmas pine, you could change up the colors to pretty much any combination you could dream up and still maintain a Christmas feel.  For my card I blended all three trees using Waffle Flower's awesome Pine Trees Stencils, choosing one color of ink for each pine. (Just FYI, this stencil gives you so much bang for your buck!  It has the outline of three pines, inserts of each tree that allow you to add details or to blend the background instead of the pine silhouette, and it also includes snow drift stencils.  I'm a huge fan!)

Okay, back to the card.  After blending the pines, I flicked on gold and white paint for a little added interest.  While that was drying, I die cut and heat embossed a sentiment from Waffle Flower's Oversized Joy Word Die and Stamp Set.  I added a second layer of white under the "joy" die cut to help it stand out a bit more and popped up the sentiment for a little dimension on this otherwise one-layer card.  
And there you have it!  What do you think?  I hope you'll try experimenting with colors this week.  I get a ridiculous amount of joy doing so.  It always keeps things interesting, right?  You can head over to the Waffle Flower Blog to see what the other designers came up with for the challenge and join the fun.  Have a wonderful weekend friends!

Friday, October 29, 2021

Concord & 9th Feature Friday + GIVEAWAY

Hello! It’s my final Feature Friday with Concord and 9th.  I’ve had so much fun creating with these fabulous products and am astounded that the month has come to an end. This week is extra special because Concord and 9th has so generously offered to GIVEAWAY a $25 gift card to their shop. **Head over to my Instagram to enter to win it!** (PS Each of the designers will be hosting a giveaway, so you have lots of chances to win.)

Today I am sharing cards featuring two bundles.  First up is the Simple Seasons Bundle.  I pulled out the "it's fall y'all" sentiment and stamped in kind of randomly on my card base in graduating colors - ballet slippergrapefruitstardust, and sea glass.  I opted not to use a misti because I wanted the background to be playful.  

Next, I pulled out the Simple Seasons Dies and cut out the pumpkin, pie, and leaf images...perfect for fall!  I decided to use a second sentiment from the set, and embossed it on stardust cardstock.  I die cut it using the little banner in the set, but I shortened the length by die cutting it twice to trim off some of the excess length.  It such a simple alteration, but it made a huge difference to allow the images to stay visible.    
My second card highlights the Say Thanks Bundle.  I'll switch things up and chat first about the sentiment and then I'll chat about the background.  The first thing I noticed in this bundle was the large scripty thank you (+ outline) in the Say Thanks Dies.  I knew I had to use it, so I cut the outline with grapefruit cardstock and layered a white "thank you" on top.  

Another fun feature about this bundle is that you can cut individual sentiments from the Say Thanks Turnabout Stamp Set with a variety of speech bubbles included in the dies.  I stamped a sentiment from the Say Thanks Turnabout Stamp Set in sea glass ink and finished off my focal trio by die cutting and layering two little hearts included in the set. 

I created my background again using the Simple Seasons Stamp Set, inking up four images in ballet slippergrapefruitstardust, and sea glass inks.  Creating stamped backgrounds is one of my absolute favorite things to do!  I popped up my focal trio, and the card was done.  Easy peasy!  

Thanks so much for joining me today.  Don't forget to pop on over to my Instagram to enter in to win the Concord & 9th gift card!

Sunday, October 24, 2021

Watercolor Christmas with Technique Tuesday

Technique Tuesday is doing a "Watercolor Christmas" feature today, and I am happy to be joining along.  I am certainly at the beginner level for watercoloring, but hopefully this project will help inspire you to pick up a paintbrush and just go for it.  

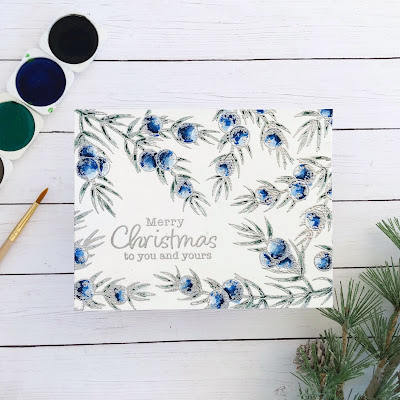
One thing I've learned is that embossing helps me a lot when I watercolor.  I don't execute the loose feel very well yet, so embossing my images really helps me.  Bounds are set, and I simply have to work within them.   I embossed this beautiful Joyous Juniper Stamp Set from Technique Tuesday in silver several times to cover my cardfront and frame a sentiment from their Classic Christmas Sentiments stamp set. 


Then, I got to work watercoloring.  I have just basic supplies, so I mixed a few colors to create the shades I wanted.  Although I was tempted to do this card in bright reds and greens, I'm a lover of blue, so I embraced juniper's natural colors.  
The Greenhouse Society line of stamps from Technique Tuesday has beautiful images and the packaging comes with a colored image of the stamps.  This is really helpful to show where shading and highlights go when you are still learning this skill.  When I started watercoloring, I put a light layer of color down on the images, and then I went back in with deeper shades of the blues and greens.  I added and added until I was content.  And when it was dry, I went back in and added a little more. ;) Obviously I was going for a bit more dramatic look here and not subtle shading.  I loved the contrast of the deep colors against the shiny silver embossing.  

Thanks for stopping by today!  You can find lots more wonderful stamps in the Technique Tuesday Christmas Collection here. I hope you'll check it out and give watercoloring a go this week.  Whether you are experienced or not, it's a lot of fun!