Showing posts with label Pretty Pink Posh. Show all posts

Friday, December 20, 2024

Fringe Tree Tags

Hello, friends!  I'm back with some more Fringe Tree goodness.  You've likely heard me say this before, but I really love making tags.  And Pretty Pink Posh's Fringe Trees were begging to be made into tags.

Those fringe layers were also begging to be ombre!  From top to bottom, the pink tag is made up of Concord and 9th's Pink Lemonade, Sweet Pea, Dragon Fruit, and Wildberry cardstock with a Wheat trunk.  I topped the tree with a sparkly, gold snowflake from the Big Christmas Cupcake Dies.


I embossed a sentiment from the  Upright Greetings: Christmas Stamp Set onto a couple of the Sentiment Strips Dies

I repeated the same design on my teal tag using Concord and 9th's Sea Glass, Tidepool, Juniper, and Rainforest cardstock.  I swapped out for another sentiment from the Upright Greetings: Christmas Stamp Set and added a star topper from the Fringe Tree Dies.

I hope that you are having a wonderful week, friends!  Thanks so much for stopping by!

CARD SUPPLIES: (with clickable links)

Thursday, December 12, 2024

Fringe Tree Forest

Hello, friends!  It sure took me longer to get this post finished than I expected.  Life has been so busy lately.  I was in charge of a big church Christmas brunch and have spent most of my "spare" time making decorations and preparing for the event. It was fun to super-size my crafty/card ideas into real life versions. 

One of the the things we made were giant wood tree clusters, not unlike the cluster of trees on today's card.  These trees were cut with Pretty Pink Posh's fabulous Fringe Tree Die in Sweet PeaSea GlassBallet Slipper, and Blueberry cardstock.  I LOVE this die so much!

If you look closely, you'll see that I dry embossed the Cascading Snowflakes Stencil on my cardbase. 
Next, I stamped a sentiment from the Upright Greetings: Christmas Stamp Set and die cut it with the
The CAS card is full of surprising texture and I love the modern feel.  I hope you, too! 
Thanks so much for taking the time to visit!  Hope you have a wonderful week!


CARD SUPPLIES: (with clickable links)
Cardstock: Ballet SlipperSweet PeaSea GlassBlueberry (Concord & 9th)

Friday, November 15, 2024

Pretty Pink Posh Merry & Bright Fringe Tree

Good morning!  I absolutely love Pretty Pink Posh's holiday release, and was delighted to be asked to guest design for them.  This is one of my favorite cards I made that I shared a few weeks ago on the Pretty Pink Posh blog.  I combined lots of new goodies (and a few old) on my card today, and I have to admit that it is one of my most favorite cards I've ever made.  These sweet, sugary colors just make me happy. 

First off, I absolutely adore the new Fringe Tree Die! You can fluff it up to add a little or a lot of dimension on your card.  It looks fabulous on its own, but I decided to deck it out with trim and sparkly ornaments from the Big Christmas Cupcake Dies. I also embossed some ornaments using the Holiday Icons Stamp Set and  coordinating dies

I framed my tree using the Wonky Stitched Rectangle Dies.  On the center panel I added some pierced snowflakes by using the Pierced Snowflakes Plate as well as some colorful floating snowflakes using the Big Christmas Cupcake Dies

The only thing missing were the presents under the tree, so I made a whole bunch of gifts using the Big Christmas Cupcake Dies.  I finished my card with a quick sentiment from the Winter Greetings Stamp Set (love this set!). 

I hope that this card makes you smile and gets you excited for holiday crafting!  Thanks so much for visiting today!

CARD SUPPLIES: (with clickable links)

Wednesday, October 16, 2024

Pretty Pink Posh October Release - Live Today!

Hello, friends!  I'm delighted to be guest designing for Pretty Pink Posh this month.  Their holiday release is amazing and so much fun to create with.  Once you get started, you won't want to stop.  The release is live today, so you can start shopping HERE now.  Yay!
One of my favorite new products is the Holiday Wreath Builder Die Set.  Don't let the name fool you, though.  This set will carry you not only through the holiday season, but all throughout the year.  Lots of wonderful possibilities with this one! 
I used the three sizes of pines to build my wreath and added some sparkling ornaments using the circle die included in the Holiday Wreath Builder Dies
Then I embossed and die cut some of the darling Holiday Icons and tucked them into my wreath.  I finished the wreath with a big pink bow from the Holiday Wreath Builder Dies.  Obviously I chose a non-traditional color scheme here, but I had gingerbread houses and candied wonderlands on my mind, so I went with it. 
I used the Pierced Snowflakes Plate to add some detail to my card base, and hung my wreath on the largest Wonky Stitched Rectangle.

The finishing touch was a sentiment from the new Winter Greetings Stamp Set and dies.
Thanks so much for stopping by today!  I hope this card brought you a smile. :) I have lots more projects to share throughout the month.  I'm looking forward to it!  Head to the Pretty Pink Posh shop HERE to snatch up these wonderful goodies.  Have a wonderful week, friends!


SUPPLIES USED: (with clickable links)

Wednesday, October 9, 2024

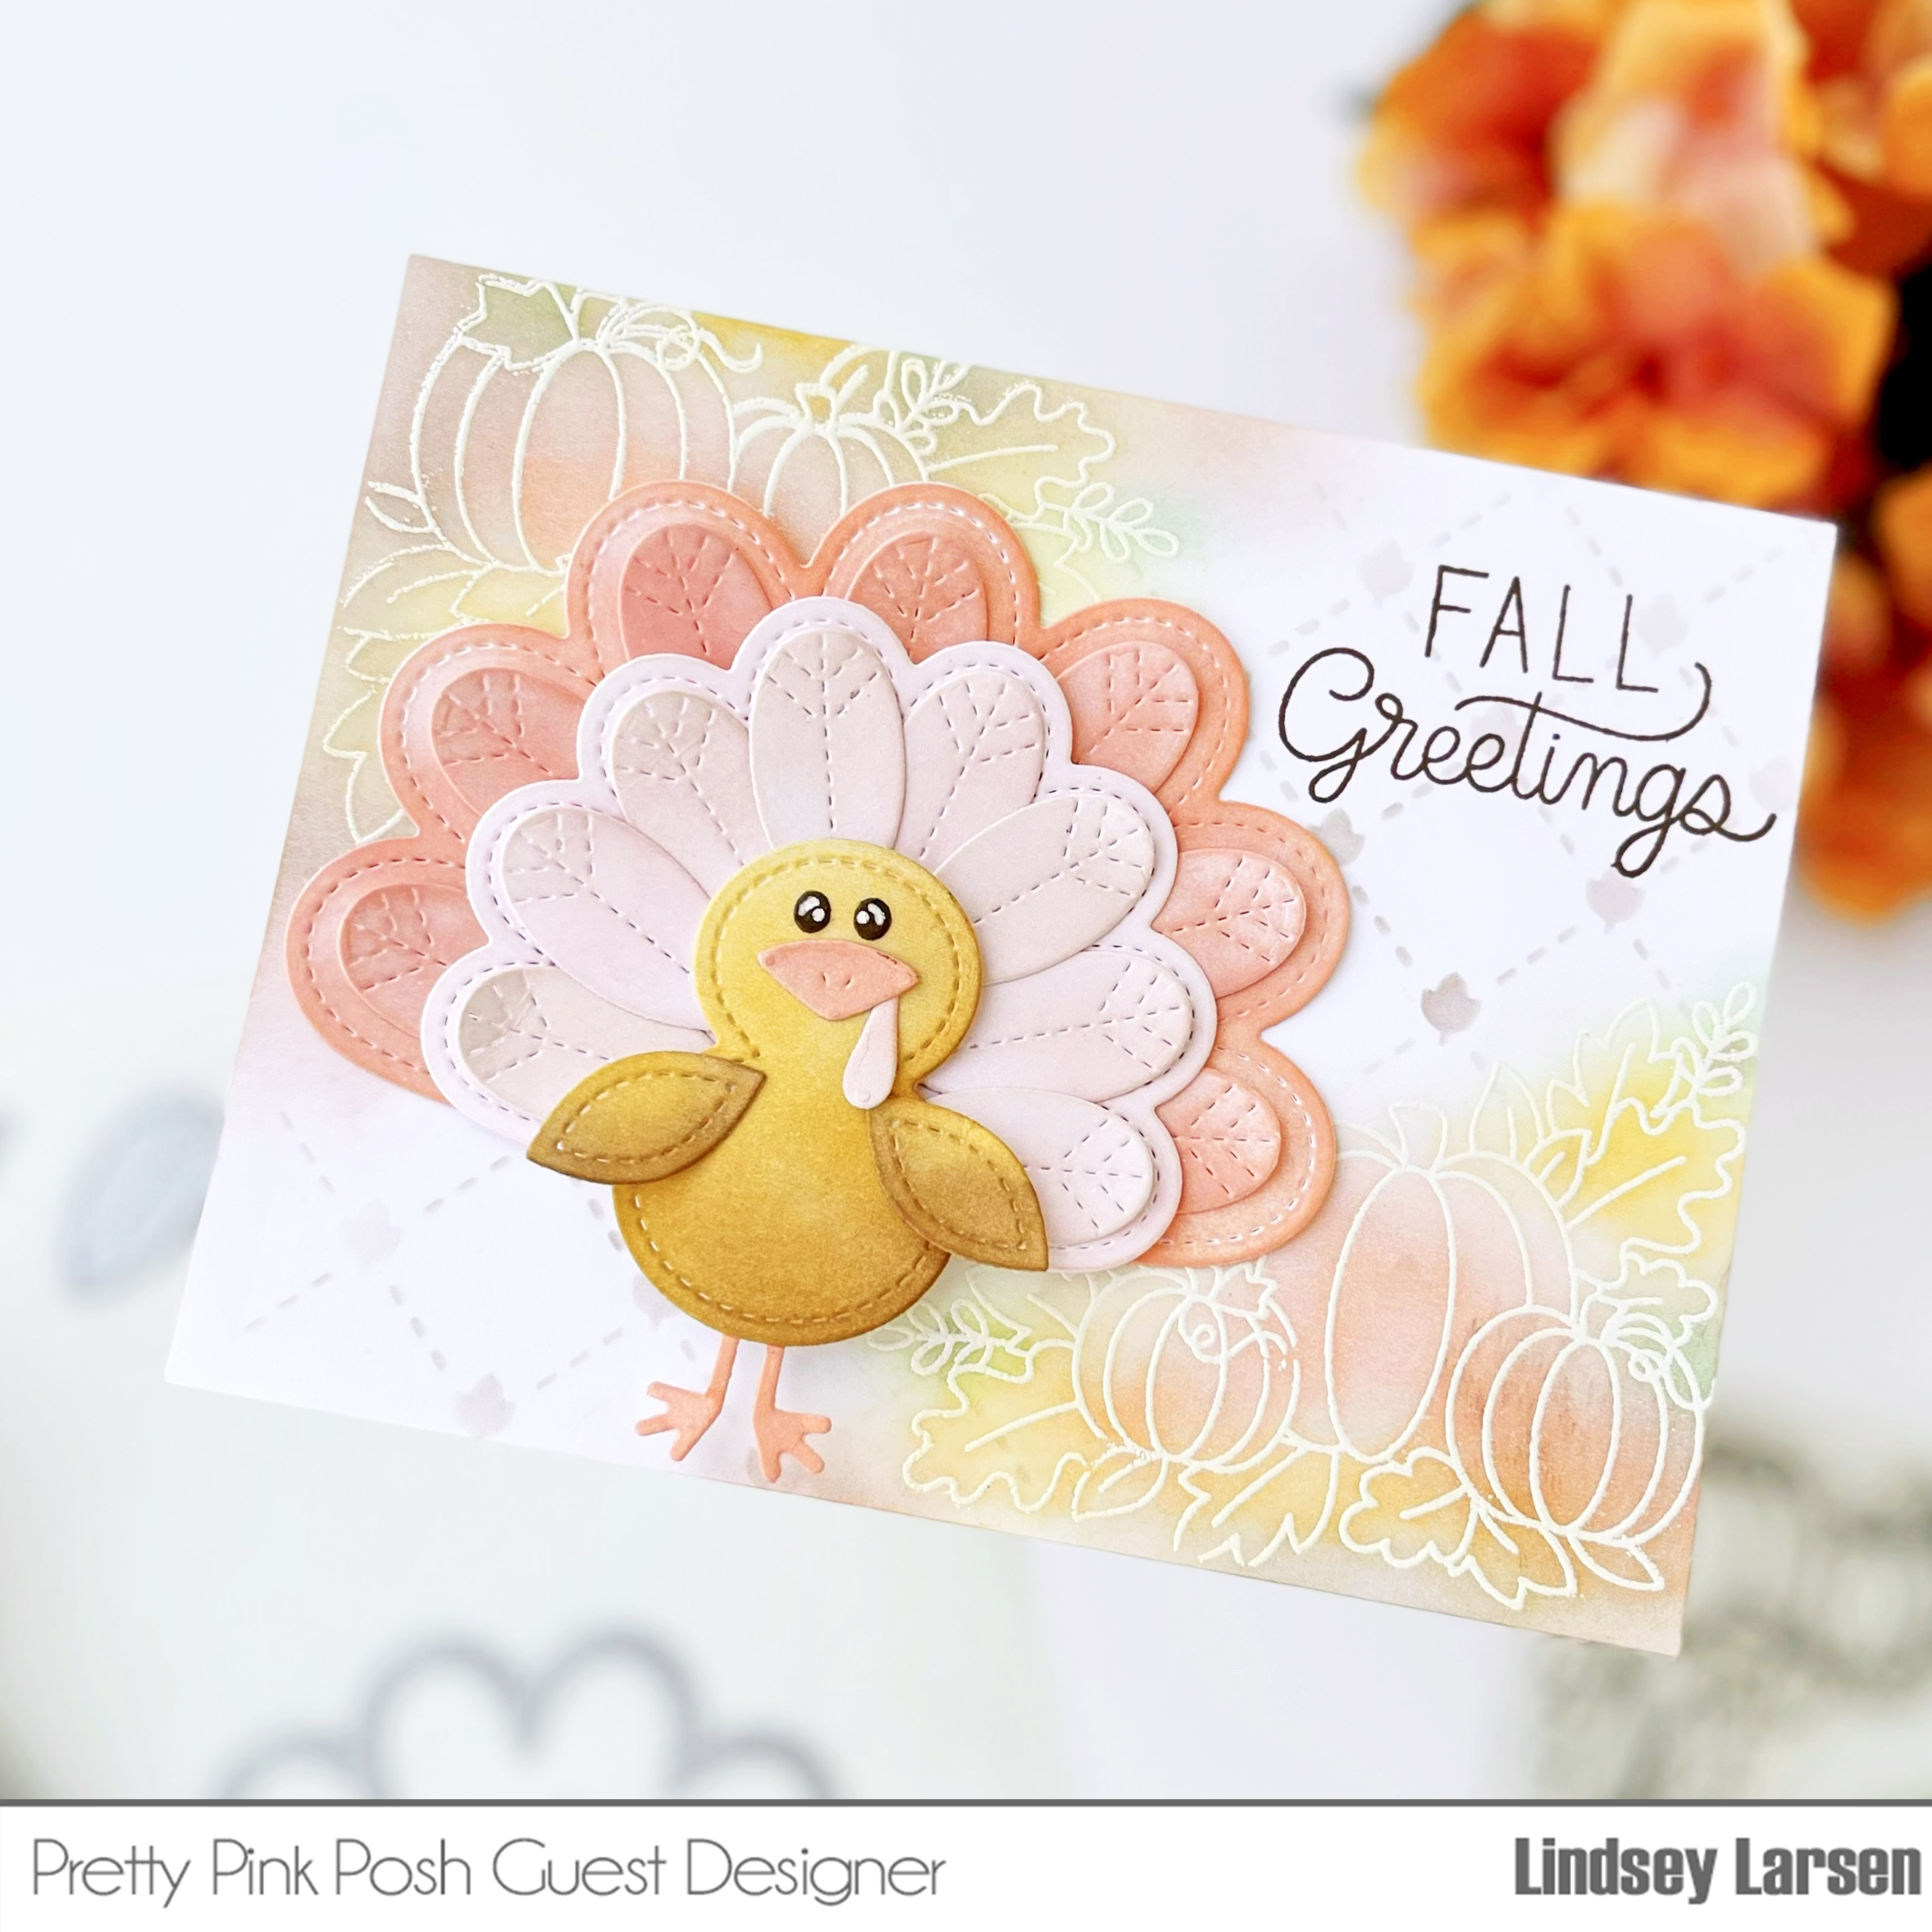
Pretty Pink Posh: Stitched Turkey

Good morning, friends!  Just popping in to share a cute turkey card that I made with some goodies from Pretty Pink Posh's fall release.  I figure if the stores can jump ahead and have three holidays in the stores all at the same time, so can I. ;)

I pulled out the cute Stitched Turkey Dies and got to work blending ink on all the different pieces.  I discovered that the individual feather die from the Big Fall Cupcake Dies fit perfectly, so I added them as well to fancy my turkey up a little.  I also swapped out his beak for the bigger beak in the Big Fall Cupcake Dies because I'm all for oversized features on animals.
There were several fabulous stencils released, and I used the Layered Leaf Lattice Stencil on my background. 
In the corners I embossed the previously released Fall Corners Stamp Set, and blended on coordinating colors. 
I finished the card with a sentiment from the Fall Bouquet Stamp Set

Thanks so much for stopping by today!  I hope you have a lovely day!


CARD SUPPLIES: (with clickable links)

Stitched Turkey Dies 

Big Fall Cupcake Dies

Layered Leaf Lattice Stencil 

Fall Corners Stamp Set

Fall Bouquet Stamp Set

Thursday, June 27, 2024

Galactic Love From Afar

Good morning, friends!  Today I wanted to share another card that I posted on the Pretty Pink Posh blog a few weeks ago during their June Release Sneak Peeks.  (You can find the full post here.) I had so much fun creating this galactic scene!   

I didn't do anything new or fancy here, but can I just say that the somewhat haphazard nature of creating galaxy backgrounds is delightful?  Distress inks, pigment inks, shimmer sprays, and paint flecks....all so much fun!  

I blended several inks and added shimmer sprays and a smidgen of glitter to my planets as well.  Speaking of planets, most of them are Pretty Pink Posh's new Planet Shaker Dies with an extra little circle die added in. 

You also get a little peek of the Rocketship Shaker Dies.  I love the sense of movement it added to the card.  

And I have to say one of my favorite parts of this card is the sentiment (from the previously released Love From Afar Dies) trailing after the rocketship. 

Thanks for stopping by!  I hope this card made you smile. :) Wishing you a stellar day!  (hee hee) 

Planet Card Supplies: (with shoppable links)

Rocketship Shaker Dies

Planet Shaker Dies

Winter Circles (small, pink planet)

Love From Afar

Concord and 9th Inks: white, carnation, aqua sky, oceanside, grape soda, juniper, clover

Distress Oxide Ink: peacock, blueprint

Heidi Swapp Shimmer Sprays

Wednesday, June 26, 2024

Celebrate! Patriotic & Football Options

Hello, friends!  Summer is flying by for us, and although I've made cards, there never seems time to get a post ready to share them.  Pretty Pink Posh had a bunch of fun new dies this release, and one of my favorites was the Stitched Stars.  I love all of the stitched dies, and I know I'll use these stars for lots of occasions.  I have two cards to share today. 

First up is a fun patriotic card, but a simple color change could make it perfect for tons of occasions.  I die cut several of the Stitched Stars.  Then I die cut the centers out of some of the bigger stars by placing a smaller star die inside.  That's how I created windows for the stars filled shaker stars. 
I filled the shakers with the new Patriotic Shaker Beads.  Then I used a teeny tiny star that I found in the Halloween House dies to create little tiny star cutouts and star confetti. 
I used the previously released Pierced Stars Plate on my powder blue card base.  (I just love the subtle detail it adds!)  And I finished my card off with the Large Celebrate Shadow Script Die for my sentiment. 

Here is another card I made using these dies.  I shared this football card on the Pretty Pink Posh Blog here during the sneak peek week.  I know we're talking about stars here, but isn't the Football Shaker Die cute?  I was so excited to get something that my son would love.  That doesn't happen all that often. 

You can read more details about how I put the football card together here. Thanks so much for taking the time to visit.  I hope you are having a wonderful week, friends!

---CARD SUPPLIES----

Patriotic Card: (with shoppable links)

Stitched Stars Dies

Pierced Stars Plate

Large Celebrate Shadow Script Die

Halloween House Dies (tiny star)

Patriotic Shaker Beads

Ink/Cardstock: poppypowder, blueprint distress oxide ink, 


Football Card: (with shoppable links)

Football Shaker Die

Wonky Stitched Rectangles (largest size)

Stitched Stars Dies

Pierced Stars Plate

Sports Stamp Set 

Espresso Sequins, Sand Sequins

Cardstock: midnight, nutmeg, matte gold foil

Tuesday, June 4, 2024

Baby Congrats

Good morning!  I had so much fun creating baby cards with Pretty Pink Posh's May Release.  The new products are absolutely darling and the timing of this release was perfect.  I have several friends who have just had or who will be having a baby in the next few months. It's a happy time for sure! 

I pulled out TONS of new products to create this card.  I started with the Layered Baby Wreath Stencil.  Aren't the images cute?  I really love this one.  I pulled out my beloved Concord & 9th inks in the following colors and got to work: StardustEucalyptusAqua SkyJuniperWheat, Nutmeg.
Next I die cut the Onesie Shaker Die twice and did a little trimming on the eucalyptus layer to make it more of a baseball tee style.  I repeatedly stamped "hello baby" from the Sentiment Strips: Occasions Stamp Set using Nutmeg ink and added a star from the Onesie Shaker Dies to finish my onesie.  
Next up was the Baby Rattle Shaker Dies.  I blended Juniper and Wheat inks on the rattle and then filled it with confetti using the tiny star dies included in the set. 
Next I added a little bottle from the Baby Mug Additions Dies as well as sentiment using the Congrats Shadow Dies

One final detail was the number block.  One of my favorite things about making cards is being able to customize them with little details that maybe even only I will notice.  This particular family is welcoming baby #4.  Hence the "4" on the block. 


To create the block I layered the "4" (from the previously released Graduation Mug Additions Dies) on top of the block in the Baby Mug Additions Dies.  Then I stacked those on top of one of the squares in the new Stacked Squares Dies 

And here you have it!  I know that was a lot of writing telling how this was all put together, but I hope you enjoy the card as much as I do.  I hope you are headed into a happy weekend, friends!


Card Supplies: (with clickable links)

Sentiment Strips: Occasions Stamp Set

Stacked Squares Dies (block)

Onesie Shaker Die

Baby Rattle Shaker Dies

Baby Mug Additions Dies

Layered Baby Wreath Stencil

Congrats Shadow Dies

Graduation Mug Additions Dies (number 4)

Concord & 9th Inks: Stardust, Eucalyptus, Aqua Sky, Juniper, Wheat, Nutmeg

Thursday, April 25, 2024

Spring Hello

Hello!  I have a sweet, simple card to share today.  I love the dainty little flowers in Pretty Pink Posh's Spring Mug Additions.  They are simple and sweet with a cute stitched detail.  I had some leftover from previous cards, and I just couldn't throw them away, so this card was born. 

I pulled out the Eyelet Rectangles Dies and used the largest die to create my card base.  Then I added some stitched detail with the Pierced Leafy Vines Plate Die.  I love this die and feel like it could be used all year. 

Next I added some of those cheerful flowers and a butterfly from the Spring Mug Additions that I had saved. 

I finished my card with a simple "hi" from the Big Easter Cupcake Dies.
And there you have it!  Easy peasy.  I hope that you are having a wonderful week, friends! 

Card Supplies: (with clickable links)
Spring Mug Additions (flowers, butterfly)
Cardstock: ButtercupSea GlassNectarTidepoolLilacSproutPink Lemonade (Concord & 9th); Lemon Tart (Papertrey Ink)

Saturday, April 20, 2024

Spring Cubbies

Good morning!  This week is Spring Theme Week over at Pretty Pink Posh, which means lots of inspiration and a 15% discount on all spring themed products.  Yay!  

I'm sharing this card over on the Pretty Pink Posh Blog.   You can find it here. I gave a card I made last fall a spring refresh. 

You can find all the card details over on this post, but you can find the card supplies below. Don't forget to pick up your favorites while they are on say here this week!


Card Supplies:

Layered Butterfly Floral Stencils  

Storybook 1 Dies

Storybook 5 Dies

Stitched Butterflies Dies

Stitched Birds Dies

Spring Mug Additions Dies 

Decorative Birdhouses Dies

Spring Foliage Die

Stitched Eggs Dies 

Sentiment Strips: Easter Stamp Set