Thursday, June 27, 2024

Galactic Love From Afar

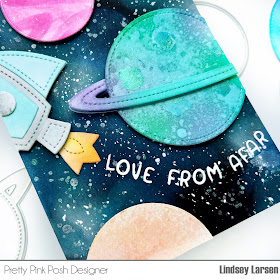
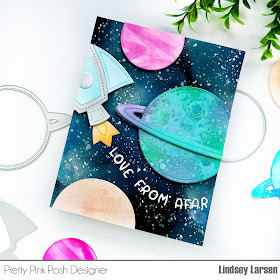
Good morning, friends!  Today I wanted to share another card that I posted on the Pretty Pink Posh blog a few weeks ago during their June Release Sneak Peeks.  (You can find the full post here.) I had so much fun creating this galactic scene!   

I didn't do anything new or fancy here, but can I just say that the somewhat haphazard nature of creating galaxy backgrounds is delightful?  Distress inks, pigment inks, shimmer sprays, and paint flecks....all so much fun!  

I blended several inks and added shimmer sprays and a smidgen of glitter to my planets as well.  Speaking of planets, most of them are Pretty Pink Posh's new Planet Shaker Dies with an extra little circle die added in. 

You also get a little peek of the Rocketship Shaker Dies.  I love the sense of movement it added to the card.  

And I have to say one of my favorite parts of this card is the sentiment (from the previously released Love From Afar Dies) trailing after the rocketship. 

Thanks for stopping by!  I hope this card made you smile. :) Wishing you a stellar day!  (hee hee) 

Planet Card Supplies: (with shoppable links)

Rocketship Shaker Dies

Planet Shaker Dies

Winter Circles (small, pink planet)

Love From Afar

Concord and 9th Inks: white, carnation, aqua sky, oceanside, grape soda, juniper, clover

Distress Oxide Ink: peacock, blueprint

Heidi Swapp Shimmer Sprays

Wednesday, June 26, 2024

Celebrate! Patriotic & Football Options

Hello, friends!  Summer is flying by for us, and although I've made cards, there never seems time to get a post ready to share them.  Pretty Pink Posh had a bunch of fun new dies this release, and one of my favorites was the Stitched Stars.  I love all of the stitched dies, and I know I'll use these stars for lots of occasions.  I have two cards to share today. 

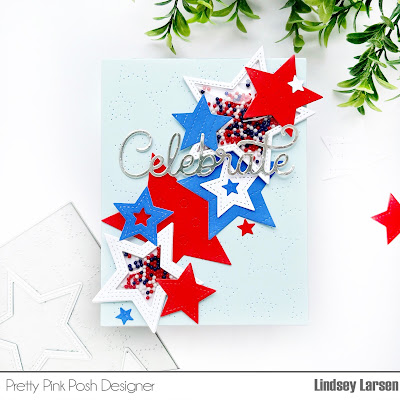
First up is a fun patriotic card, but a simple color change could make it perfect for tons of occasions.  I die cut several of the Stitched Stars.  Then I die cut the centers out of some of the bigger stars by placing a smaller star die inside.  That's how I created windows for the stars filled shaker stars. 
I filled the shakers with the new Patriotic Shaker Beads.  Then I used a teeny tiny star that I found in the Halloween House dies to create little tiny star cutouts and star confetti. 
I used the previously released Pierced Stars Plate on my powder blue card base.  (I just love the subtle detail it adds!)  And I finished my card off with the Large Celebrate Shadow Script Die for my sentiment. 

Here is another card I made using these dies.  I shared this football card on the Pretty Pink Posh Blog here during the sneak peek week.  I know we're talking about stars here, but isn't the Football Shaker Die cute?  I was so excited to get something that my son would love.  That doesn't happen all that often. 

You can read more details about how I put the football card together here. Thanks so much for taking the time to visit.  I hope you are having a wonderful week, friends!

---CARD SUPPLIES----

Patriotic Card: (with shoppable links)

Stitched Stars Dies

Pierced Stars Plate

Large Celebrate Shadow Script Die

Halloween House Dies (tiny star)

Patriotic Shaker Beads

Ink/Cardstock: poppypowder, blueprint distress oxide ink, 


Football Card: (with shoppable links)

Football Shaker Die

Wonky Stitched Rectangles (largest size)

Stitched Stars Dies

Pierced Stars Plate

Sports Stamp Set 

Espresso Sequins, Sand Sequins

Cardstock: midnight, nutmeg, matte gold foil

Wednesday, June 12, 2024

Pretty Pink Posh June Release Blog Hop

Good morning, friends!  Welcome to Day 3 of the Pretty Pink Posh June Release Blog Hop!  All of these products are available to purchase, and you can click here to shop.  

Since Father's Day is almost here, I decided to make a set of Father's Day cards, but really these cards could be given any time of year to show our dads some love.  I mixed several old and new products here, so some things might look familiar.  

When I saw the City Buildings Dies, one of my first thoughts was a superhero nighttime skyline, so I decided to go with it.  I die cut the buildings, and then to speed the process up a bit, I layered rectangles of red, blue, or yellow behind the dies instead of inlaying the color pieces. 


I created the background using the previously released Starburst Stencil.  It was the perfect thing to draw the eye in, but also reminded of the searchlights they send out to superheroes. 

I used the older Dad Coordinating Dies and the Mini Polka Dots Stencil to add some tone-on-tone dots.  I also die cut them a second time in black, so they would have a shadow.  

I finished the cards by adding "you're my hero" from the Helper Vehicles Stamp Set.  
I had so much fun making this card that I decided to make a second version just changing the orientation of the card. 


This time I off-set the sentiment just a bit and added a few stars from the  Americana Mix Clay Confetti.
I hope these cards make you smile!  I'm really looking forward to delivering these. 

**GIVEAWAY**
Thanks so much for stopping by!  The fun has just begun, so make sure that you continue on with the hop.  All of the stops are listed below.  And make sure to leave a comment at each stop by 11:59 PST on 6/17/2024 to be entered in for a chance to win a $30 gift certificate to Pretty Pink Posh.  (There are 3 gift certificates up for grabs.  One winner will be chosen each day, and all winners will be announced on the Pretty Pink Posh Blog.)  Happy hopping, friends! 

Dad Hero Card Supplies: (with clickable links)

City Buildings Dies

Dad Coordinating Dies

Helper Vehicles Stamp Set (you're my hero)

Starburst Stencil

Mini Polka Dots Stencil

 Americana Mix Clay Confetti (stars)

Concord & 9th Cardstock: buttercup, poppy, aqua sky, black

Wednesday, June 5, 2024

Waffle Flower June Release Day + GIVEAWAY

Good morning!  Today is Waffle Flower's Floral Frames Release Day.  Hooray!   You can shop all the new goodies HERE.  Plus, I have a GIVEAWAY to share with you, so make sure you read to the bottom of the post. 

There are so many things to love this release and one common theme that made me especially happy is that lots of things are mega-sized: the flowers, the sentiments, the frames, the postage.  
From the Sketched Marigold to the Oversized Take Care Print Die to the Inside/Outside Scalloped Elongated Oval Die, this card is full of powerhouse products.  Each one could take center stage and be a fabulous focal point, but they also pair beautifully together.

I embossed the flower in white to maintain a softer feel on the card.  Then, using strawberry blonde marigolds as my inspiration, I colored the image using the matching Sketched Marigold Stencil.  It made coloring the image a breeze!


I used the largest Inside/Outside Scalloped Elongated Oval Die to anchor my flower and added the fabulous Oversized Take Care Print Die.  There is also an Oversized Get Well Print Die releasing this month.  Love them both!
A few orange splatters and my card was finished. :) 

Thanks so much for visiting today!  All of these fabulous products and more are available today, so make sure you head over to the Waffle Flower Shop to check out this amazing new release.  But before you go, don't forget to enter the giveaway. :) 

*****GIVEAWAY*****

Just leave a comment below by 11:59 pm EST June 7, 2024 and you will have a chance to win a $20 gift certificate to Waffle Flower Crafts.  I'll be accepting comments on my instagram account, too, so make sure you head over there as well for an additional entry. :) Several other design team members are hosting giveaways, and you can use #WaffleFlowerGiveaway to quickly search for them. 

Tuesday, June 4, 2024

Waffle Flower Sneak Peek Day 3: Oversized Postage

Hello, again!  I'm back with another Waffle Flower Sneak Peek of their new release.  You'll be able to shop all this fabulous goodies here here tomorrow.  Today is a fun one!  The Oversized Postage Stamp Set & Die are must haves in my opinion.  I had a blast designing with this mega-sized stamp!  

The world is your oyster here, but I've always been partial to purchasing floral stamps at the post office, so that's what I decided to create.  I pulled out the new Sketched Poppy and Sketched Marigold Stamp Sets and then colored them using the coordinating stencils.  Speaking of stencils, did you know that Waffle Flower is releasing a few new grip mats this release?  There have been a few updates to the product, but you definitely don't need to switch if you already have some.  They are also introducing a couple new sizes.  I'm excited about the 7.5x11 one.  I love the large size since I've been making some larger size cards these days.  I use the grip mats every time I stencil now.  They hold the stencil and my ink pad in place perfectly.  
Coloring the background in with a black marker gave the whole project a different feel and made the Sketched Poppy and Sketched Marigold pop. 
I embossed a few stamps from the Oversized Postage Stamp Set and essentially left the card sentiment-less.  Sometimes you just need a good any occasion card.  You know what I mean?  Oh, one last thing.  If you take a look at the card base, you’ll also see the new Random Rhombus Stencil making an appearance. 
Thanks so much for visiting today!  I'll have another card to share tomorrow, so hope to see you back soon. :) 

Baby Congrats

Good morning!  I had so much fun creating baby cards with Pretty Pink Posh's May Release.  The new products are absolutely darling and the timing of this release was perfect.  I have several friends who have just had or who will be having a baby in the next few months. It's a happy time for sure! 

I pulled out TONS of new products to create this card.  I started with the Layered Baby Wreath Stencil.  Aren't the images cute?  I really love this one.  I pulled out my beloved Concord & 9th inks in the following colors and got to work: StardustEucalyptusAqua SkyJuniperWheat, Nutmeg.
Next I die cut the Onesie Shaker Die twice and did a little trimming on the eucalyptus layer to make it more of a baseball tee style.  I repeatedly stamped "hello baby" from the Sentiment Strips: Occasions Stamp Set using Nutmeg ink and added a star from the Onesie Shaker Dies to finish my onesie.  
Next up was the Baby Rattle Shaker Dies.  I blended Juniper and Wheat inks on the rattle and then filled it with confetti using the tiny star dies included in the set. 
Next I added a little bottle from the Baby Mug Additions Dies as well as sentiment using the Congrats Shadow Dies

One final detail was the number block.  One of my favorite things about making cards is being able to customize them with little details that maybe even only I will notice.  This particular family is welcoming baby #4.  Hence the "4" on the block. 


To create the block I layered the "4" (from the previously released Graduation Mug Additions Dies) on top of the block in the Baby Mug Additions Dies.  Then I stacked those on top of one of the squares in the new Stacked Squares Dies 

And here you have it!  I know that was a lot of writing telling how this was all put together, but I hope you enjoy the card as much as I do.  I hope you are headed into a happy weekend, friends!


Card Supplies: (with clickable links)

Sentiment Strips: Occasions Stamp Set

Stacked Squares Dies (block)

Onesie Shaker Die

Baby Rattle Shaker Dies

Baby Mug Additions Dies

Layered Baby Wreath Stencil

Congrats Shadow Dies

Graduation Mug Additions Dies (number 4)

Concord & 9th Inks: Stardust, Eucalyptus, Aqua Sky, Juniper, Wheat, Nutmeg

Monday, June 3, 2024

Waffle Flower Sneak Peek Day 2

Good morning!  I'm back with another Waffle Flower sneak peek, and all I have to say is bigger is better!  At least that is the case with this card. :)  

I used the beautiful new Layered Flower Duo Die-n-stencil as well as the Oversized Take Care Die Print Die, and with their fabulously large size it didn’t take much to fill the card.  

I started by blending Concord and 9th's Oceanside ink onto a card base that I had cut with the Sweet Plaid Texture Die.  

Then I cut several flowers with the Layered Flower Duo Die.  The coordinating stencil is easy to align and is designed to help put shading in all the right spots.  Love that!  I used Concord and 9th's Carnation and Dragonfruit inks on my flowers, and Sprout, Parsley, and Clover on the Leaves. 

To finish the card I simply framed the flowers around the Oversized Take Care Die Print Die.  It really doesn't take much to make these oversized products shine. 

Thanks for visiting!  I'll have another sneak peek for you tomorrow.  See you soon!

Sunday, June 2, 2024

Waffle Flower Flower Frames Release: Sneak Peek Day 1

Hello, friends!   One of the best parts about the start of a new month is a new release by Waffle Flower.  I'll be sharing sneak peeks over the next few days starting with some fabulous florals today.  

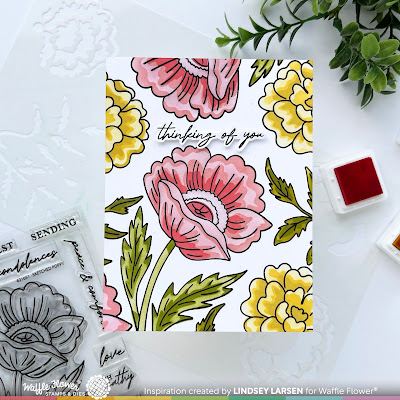
You can’t go wrong with any of the Sketched Flower Sets.  I combined the new Sketched Poppy and Sketched Marigold Stamp Sets and used the matching stencils to color them in.  You can absolutely use your favorite medium of choice to color these in, but the stencils really do make it so easy.  
One of my favorite things about these sets are the fabulous sentiments.  That handwritten font is amazing.  I’m a big fan!  I did a little fussy cutting around the sentiment, but otherwise left this as just a single layer card.  
There are four florals releasing this month with coordinating stencils and dies, so you could easily swap out different flowers and colors and recreate this design in lots of different ways.  I plan to do just that. :) 

Thanks so much for stopping by!  I'll be back with several sneak peeks this week, so make sure to come back.  Have a lovely week, friends!